
HP StorageWorks Controller Enclosure 4Gb Array Controller Replacement Instructions (631505-001, August 2010)

• Using the array controller
Shut down using HP Command View EVA
1. Power down the controller enclosure with HP Command View EVA
or the Web-based operator control panel (WOCP). Powering down
the controller enclosure also removes power from the disk enclosures.
To power down using HP Command View EVA:
2. In the navigation pane, select your storage system. The Initialized
Storage System Properties window for the storage system opens.
3. Click Shut down. The Shutdown Options pane opens.
4. Under System Shutdown, click Power Down.
• To delay start of the shutdown, if needed, in the Power the
Whole Systems OFF section, set a value of up to 60 minutes in
the Shutdown delay field to delay power down of the array.
• The controllers complete an orderly shutdown and then power
off. Next, the disk enclosures power off. Wait for the shutdown
to complete.
5. Power on each disk enclosure by pressing the power button on each
enclosure.
6. Power on the controller enclosure, which powers on both controllers.
7. Allow the array to start up completely.
8. Once the array is running, use HP Command View EVA or the
Web-based Operator Control Panel (WOCP) for further
troubleshooting and to complete a successful, graceful halt
(shutdown) before replacing the controller (a warm swap). Do not
replace the controller until the graceful halt completes. Verify that
the controller has shut down properly by checking these indicators:
• the UID indicator is illuminated (blue)
• the Attention indicator is illuminated (orange)
Go to step 2 in Removing a controller, page 2 to proceed with the
replacement instructions.
Shut down using the array controller
NOTE:
You must press and hold the power button for the full 10
seconds as noted in the following steps, otherwise the shutdown
will not be completed. This shutdown method does not power
off the disk enclosures.
1. Push and hold the on/standby button on the front panel of the
EVA4400. After 4 seconds, the power button and the green LED
start to blink.
2. Continue pressing the power button for 10 seconds; the power
button and the green LED continue to blink. At this point, the power
shuts down.
NOTE:
See the Important note on page 2 for additional details
about the controller being shut down.
3. Power on the controller enclosure, which powers on both controllers.
4. Allow the array to start up completely.
5. Once the array is running, use HP Command View EVA or the
Web-based Operator Control Panel (WOCP) for further
troubleshooting and to complete a successful, graceful halt
(shutdown) before replacing the controller (a warm swap). Do not
replace the controller until the graceful halt completes. Verify that
the controller has shut down properly by checking these indicators:
• the UID indicator is illuminated (blue)
• the Attention indicator is illuminated (orange)
Go to step 2 in Removing a controller, page 2 to proceed with the
replacement instructions.
Installing a controller
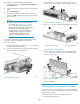
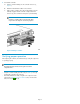
1. Press each DIMM from the removed controller into the same DIMM
socket on the replacement controller (1, Figure 7).
Figure 7 Installing a DIMM
.
2. Press the retaining clips inward to lock each DIMM into the socket
(2).
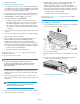
3. Place the cover on the controller module rails and slide the cover
over the controller until the latch clicks in place.
Figure 8 Installing the controller cover
.
Page 4