
HP 4400 Enterprise Virtual Array Expansion Rack Reference Guide (5697-2285, January 2013)


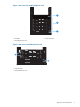
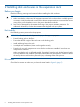
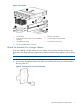
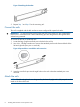
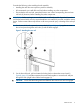
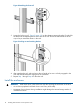

Figure 3 Kit contents
Rails with –03 brackets5.Disk enclosure1.
Two Fibre Channel copper cables6.Eight disk drive blanks (may come pre-installed in
enclosure)
2.
Two enclosure power cords7.–04 brackets (not used)3.
Pins for round-hole cabinet conversion4.
Attach the brackets for a longer chassis
If you are installing a longer chassis into your cabinet, such as for the controller enclosure, you
must remove the shipping retaining bracket and install the smaller brackets supplied in the accessory
kit.
NOTE: A No. 2 Phillips head screwdriver is required for this procedure.
1. Remove the existing thumbscrew and shipping retaining bracket from the rear of the rail.
2. Insert a screw through the bottom hole of the new bracket and loosely secure the bracket to
the rear of the rail.
Figure 4 Inserting screw into the new bracket
Attach the brackets for a longer chassis 7