
HP 4400 Enterprise Virtual Array Expansion Rack Reference Guide (5697-2285, January 2013)

1. Verify that each fabric Fibre Channel switch to which the HSV controllers are connected is
powered up and fully booted. The power indicator on each switch should be on.
If you must power up the SAN switches, wait for them to complete their power-on boot process
before proceeding. This may take several minutes.
NOTE: Before applying power to the rack, ensure that the power switch on each HSV
controller is off.
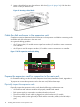
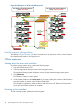
2. Power on the circuit breakers on both EVA rack PDUs. Verify that all drive enclosures are
operating properly. The status indicator and the power indicator should be on (green).
3. Wait three minutes and then verify that all disk drives are ready. The drive ready indicator
and the drive online indicator should be on (green).
4. Power on the upper controller (Controller A). It takes the role of master controller.
5. Wait 10 seconds and then power on the lower controller (Controller B). It takes the role of
slave controller.
6. Verify that the Operator Control Panel (OCP) display on each controller displays the storage
system name and the EVA WWN.
7. Start HP Command View EVA and verify connection to the storage system. If the storage system
is not visible, click HSV Storage Network in the Navigation pane, and then click Discover in
the Content pane to discover the array.
NOTE: If the storage system is still not visible, reboot the management server to re-establish
the communication link.
8. Check the storage system status using HP Command View EVA to ensure everything is operating
properly. If any status indicator is not normal, check the log files or contact your HP-authorized
service provider for assistance.
Offline expansion 19