
HP 4400 Enterprise Virtual Array Expansion Rack Reference Guide (5697-2285, January 2013)

Inspect expansion rack disk drives
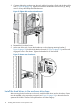
After the expansion rack is powered up, ensure that all disk drives are fully engaged and seated
in their associated enclosures. Observe the disk drive status indicators to ensure that the disks are
working properly. The status indicators will be amber or blue depending on the condition of the
disk enclosure. See Figure 18 (page 15) for the location of the disk drive indicators and
Table 2 (page 15) for a description of the indicators.
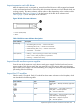
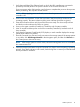
Figure 18 Disk drive status indicators
1. Bi-color (amber/blue)
2. Green
Table 2 Disk drive status indicator descriptions
DescriptionStatus indicator
Bi-color (top)
• Slow flashing blue (0.5 Hz) — Used to locate drive.
• Fast flashing blue (4 Hz) — Used for reserved locate.
• Medium flashing blue (1 Hz) — Used for critical locate.
• Solid amber — Drive fault.
Green (bottom)
• Flashing — Drive is spinning up or down and is not ready.
• Solid — Drive is ready to perform I/O operations.
• Flickering — Indicates drive activity.
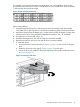
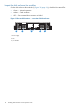
Inspect the disk enclosure power supplies
From the rear of the expansion rack, observe each power supply. Each disk enclosure has two
power supplies. Each power supply has one green LED on its fan casing. Make sure the green
light on each power supply is on and not flashing. If not, diagnose and correct the problem before
proceeding with the next steps.
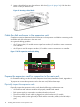
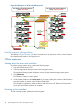
Inspect the I/O modules
Observe each I/O module. Each I/O module has three status indicators on the faceplate, which
are described in the following table:
DescriptionTypeStatus indicator
Flashing blue — Remotely asserted by application
client
Locate
Flashing green — I/O module powering up
Solid green — Normal operation
Health
Off — Firmware malfunction
Flashing amber — Warning condition (not visible
when solid amber is displaying)
Solid amber — Replace component
Fault
Off — Normal operation
Prepare the expansion rack for connection to the main rack 15