
HP 4400 Enterprise Virtual Array Expansion Rack Reference Guide (5697-2285, January 2013)
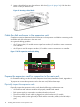
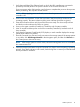

For example, if you have four enclosures and eight drives, you could install four drives in bay 1
of each enclosure and four drives in bay 2 of each enclosure. Do not install all the drives in enclosure
1 and leave the other enclosures empty.
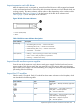
Figure 14 Disk drive bay numbering
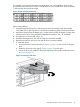
Follow these guidelines:
1. Install the largest disk drives first, continuing with sizes in descending order (for example,
1000 GB first, then 450 GB, down to 146 GB drives) balancing drives across the enclosures.
2. Install drives starting from the bottom (slot 1 on the enclosure shelf, the highest –LH slot), then
install upward until you have installed the largest drive quantity in slot 1 of each shelf.
3. Proceed to slot 2 of each shelf, and so on.
4. Install the next largest drive size until all of that size have been installed.
5. Repeat the process for each drive size until all drives have been installed.
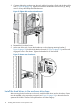
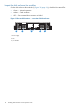
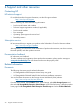
1. To install disk drives:
a. Insert the disk drive into the drive bay (1, Figure 15 (page 13)) until it clicks, locking the
drive.
b. Rotate the drive lever to the right (2, Figure 15 (page 13)) until it locks.
c. Ensure the drives are installed in the proper sequence, following the numbering scheme
in Figure 14 (page 13).
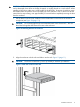
Figure 15 Inserting a disk drive
Install the hard drives in the enclosure drive bays 13