
HP 4400 Enterprise Virtual Array Expansion Rack Reference Guide (5697-2285, January 2013)
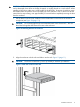
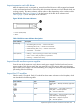
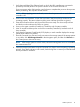

3. Continue sliding the enclosure into the rack until the front edge is flush with the front of the
rack (1, Figure 12 (page 12)). Tighten the enclosure thumbscrews into the rack (2), taking
care to not strip the Phillips-head thumbscrews.
Figure 12 Tighten disk enclosure thumbscrews
4. Reattach the front bezel covers.
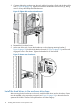
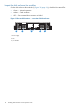
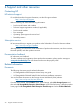
5. At the rear of the rack, loosen the thumbscrew on the shipping retaining bracket (1,
Figure 14 (page 13)) and slide the bracket forward (2, Figure 14 (page 13)) until the tab
engages the slot in the chassis. Tighten the thumbscrew on the bracket.
Figure 13 Secure rear of enclosure
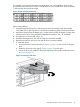
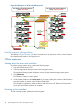
Install the hard drives in the enclosure drive bays
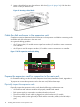
After securing the disk enclosures in the rack, install the hard drives into the drive bays. Drives
must be installed in the proper bay sequence (see Figure 14 (page 13)) in the enclosures for
optimum HP P6000 Command View performance and data integrity.
12 Installing disk enclosures in the expansion rack