
HP StorageWorks ESL E-Series Tape Library Internal Network Kit Installation and Replacement Instructions (AH997-96001, September 2007)

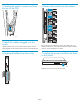

15 Install the cable clamps and route
the cables
If you are replacing the switch, skip this step because the cable clamps
will already be installed.
ACT/
LNK
ACT/
LNK
PORT 1 PORT 0 ETHERNET
SERIAL
PWR
FIBRE
CHANNEL
FIBRE
CHANNEL
ACT/
LNK
ACT/
LNK
ACT/
LNK
PORT 1 PORT 0 ETHERNET
SERIAL
PWR
FIBRE
CHANNEL
FIBRE
CHANNEL
ACT/
LNK
ACT/
LNK
ACT/
LNK
PORT 1 PORT 0 ETHERNET
SERIAL
PWR
FIBRE
CHANNEL
FIBRE
CHANNEL
ACT/
LNK
L
11669
Remove the top screw from drive cluster 2, install a cable clamp there,
and use this cable clamp to route the Ethernet cables from the switch
todriveclusters0,1,and2.Removethetopscrewfromdrivecluster
4, install a cable clamp there, and use this cable clamp to route the
Ethernet cables from the switch to drive clusters 3, 4, and 5.
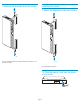
16 Plug t
heswitch’spowercordintothe
top of th
ePDU
11592
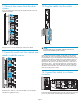
17 Verify that the power and link LEDs
on the switch are solid green
11593
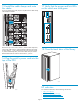
18 Close th
e back door of the library
10545
HP web sites
For additional in formation, see the following H P web sites:
•h
ttp://www.hp.com
•http://www.hp.com/go/storage
•http://www.hp.com/service_locator
•http://www.hp.com/suppor t/manuals
Page 5