
HP StorageWorks ESL E-Series Tape Library Cross Link Controller Replacement Instructions (June 2005)
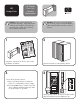


Secure the CLM controller to the cabinet frame
using the 4 Phillips screws removed in Step 7.
18
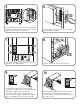
Re-route and connect the cables that were
disconnected in Step 6.
17
19
Ensure that the CLM controller power switches are
set to the on position.
21
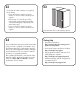
Power on the primary cabinet:
a. Verify that power cables are firmly in place.
b. Press the power button located behind the
laptop tray.
c. After several minutes, verify that the state of
the cabinet appears in the System State as
“Online, OK”.
Note: If the System State is “Online,
Warning” or “Online, Critical”, check the
Health Status screen. It may not be a
CLM-related issue.
16
Lift the CLM controller slightly to align its mounting
holes with the holes on the cabinet frame.
20
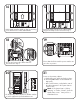
On the primary cabinet, flip the two breaker switches
on (to the right) at the power distribution unit.