
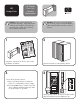
HP StorageWorks ESL E-Series Tape Library Cross Link Controller Replacement Instructions (June 2005)
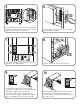


Disconnect the power cable, controller cable, and
all Ethernet cables from the CLM controller, noting
their locations for later re-connection.
5
Pull the cables out of the access hole on the right
side of the CLM controller.
6
Remove the 4 Phillips screws that secure the CLM
controller to the cabinet frame.
7
Slide the CLM controller out of the cabinet.
8
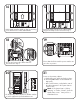
For each power supply on the existing CLM
controller, loosen the captive screw at the top right
of the power supply using a #2 Phillips
screwdriver. Pull the power supply handle to
remove the power supply. Set the power supplies
aside for installation in the new CLM controller.
9
Insert the CLM controller power supplies into the
power supply bays in the replacement CLM
controller. Use a #2 Phillips screwdriver to tighten
the captive screws.
10