
HP StorageWorks ESL E-Series Ultrium FC Drive Upgrade Instructions (December 2005)


FC Port A
FC Port B
Installation
8
5
6
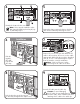
Push the drive the rest of the way into
the drive bay and tighten the captive screw.
Remove FC port A end caps and attach the FC
cable to the new drive. Be sure to use the cable
appropriately labeled for the new drive, identified
as A, B, C or D. It should already be in place
from the interface controller installation.
Note: Only use FC port A when
connecting the FC cable to the drive.
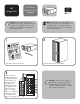
Remove the plate covering the bay in which the
drive will be installed by removing the screw.
Slide the
upgrade
drive half-
way into the
drive bay.
FC Port A
FC Port B
9
Insert the FC cable into the cable clip.
Caution: To avoid damaging
the FC cable, do not sharply bend or
pinch the cable. Allow a radial bend when
attaching the FC cable to the cable clip.
A
B
D
C
4
Identify the location for the new drive.
Note: Drives must be installed in order.
Bay A must be filled first, then bay B, bay
C, and finally bay D.
7