
HP StorageWorks ESL E-Series Ultrium FC Drive Replacement Instructions (December 2005)


HP
StorageWorks
ESL E-Series
Ultrium FC Drive
Replacement
HP
StorageWor
k
s
ESL E-Series
U
ltrium FC
Dri
v
e
R
eplac
ement
h
p
S
t
o
r
a
g
e
W
o
r
k
s
C
a
u
t
i
o
n
:
P
a
r
t
s
c
a
n
b
e
d
a
m
a
g
e
d
b
y
e
l
e
c
t
r
o
s
t
a
t
i
c
d
i
s
c
h
a
r
g
e
.
K
e
e
p
p
a
r
ts
i
n
t
h
e
i
r
c
o
n
t
a
i
n
e
r
s
un
t
i
l
n
e
e
d
e
d
.
E
n
s
u
r
e
y
o
u
a
r
e
p
r
o
p
e
r
ly
g
r
o
u
n
d
e
d
w
h
e
n
t
o
u
c
h
i
n
g
s
t
a
t
i
c
-
s
e
n
s
i
t
i
v
e
c
o
m
p
o
n
e
n
t
s
.
N
o
t
e
:
T
h
i
s
p
a
r
t
i
s
h
o
t
-
p
l
ug
g
a
bl
e
.
I
t
i
s
n
o
t
n
e
c
e
s
s
a
r
y
to
p
o
w
e
r
d
o
w
n
t
h
e
l
i
b
r
a
r
y
t
o
r
e
p
l
a
c
e
t
h
i
s
p
a
r
t
.
3
4
1
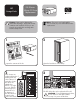
T
a
p
e
d
r
i
v
e
s
c
l
u
s
t
e
r
s
a
r
e
n
u
m
b
e
r
e
d
s
t
a
r
t
i
n
g
a
t
t
h
e
t
o
p
o
f
t
h
e
c
a
b
i
n
e
t
a
s
f
o
l
l
o
w
s
:
0
,
1
,
2
,
3
,
4
,
5
.
I
n
e
a
c
h
c
l
u
s
t
e
r
t
h
e
d
r
i
v
e
s
a
r
e
i
d
e
n
t
i
f
i
e
d
a
s
f
o
l
l
o
w
s
:
t
o
p
r
i
g
h
t
i
s
A
,
t
o
p
l
e
f
t
i
s
B
,
bo
t
t
o
m
r
i
g
h
t
i
s
C
,
b
ot
t
o
m
l
e
f
t
i
s
D
.
A
d
r
a
w
i
n
g
s
h
o
w
i
n
g
t
h
i
s
i
s
o
n
t
h
e
i
n
s
i
d
e
of
t
h
e
b
a
c
k
d
o
o
r.
O
pe
n
th
e
b
ac
k
d
o
o
r
of
t
he
li
br
a
r
y
.
I
n
s
p
e
c
t
t
h
e
c
o
n
t
e
n
t
s
of
t
h
e
k
i
t
.
0
1
2
3
4
5
1
2
4
h
p
S
t
o
r
a
g
e
W
o
r
k
s
E
SL
E
-
s
e
r
i
e
s
T
a
p
e
D
r
i
v
e
C
a
u
t
i
o
n
:
P
a
r
t
s
c
a
n
b
e
d
a
m
a
g
e
d
b
y
e
l
e
c
t
r
o
s
t
a
t
i
c
d
i
s
c
h
a
r
g
e
.
K
e
e
p
p
a
r
t
s
i
n
t
h
e
i
r
c
o
n
t
a
i
n
e
r
s
u
n
t
i
l
n
e
e
d
e
d
.
E
n
s
u
r
e
y
o
u
a
r
e
p
ro
p
e
r
l
y
g
r
o
u
n
d
e
d
w
h
e
n
t
o
u
c
h
i
n
g
s
t
a
t
i
c
-
s
e
n
s
i
t
i
v
e
c
o
m
p
o
n
e
n
t
s
.
N
o
t
e
:
T
h
i
s
p
a
r
t
i
s
h
o
t
-
p
l
u
g
g
a
b
l
e
.
I
t
i
s
n
o
t
n
e
c
e
s
s
a
r
y
t
o
p
o
w
e
r
do
w
n
t
h
e
l
i
b
r
a
r
y
t
o
r
e
p
l
a
c
e
t
h
i
s
p
a
r
t
.
2
4
3
1
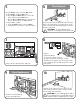
I
d
e
n
t
i
f
y
t
h
e
t
a
p
e
d
r
i
v
e
t
o
b
e
r
e
p
l
a
c
e
d
.
T
he
L
E
D
o
f
t
h
e
d
r
i
v
e
w
i
l
l
b
e
r
e
d
o
r
o
f
f
.
T
a
p
e
d
ri
v
e
s
c
l
u
s
t
e
r
s
a
r
e
n
u
m
b
e
r
e
d
s
t
a
r
t
i
n
g
a
t
t
h
e
t
o
p
o
f
t
h
e
c
a
bi
n
e
t
a
s
f
o
l
l
o
w
s
:
0
,
1
,
2
,
3
,
4
,
5
.
I
n
e
a
c
h
c
l
u
s
t
e
r
t
h
e
d
r
i
v
e
s
a
r
e
i
d
e
n
t
i
f
i
e
d
a
s
f
o
l
l
o
w
s
:
t
o
p
r
i
g
h
t
i
s
A
,
t
o
p
l
e
f
t
i
s
B
,
b
o
t
t
o
m
r
i
g
h
t
i
s
C
,
b
o
t
t
o
m
l
e
f
t
is
D
.
A
d
r
a
w
i
n
g
s
h
o
w
i
ng
t
h
i
s
i
s
o
n
t
h
e
i
n
s
i
d
e
o
f
t
h
e
b
a
c
k
d
o
o
r
.
O
p
e
n
t
h
e
b
a
c
k
d
o
o
r
o
f
t
h
e
l
i
b
r
a
r
y
.
I
n
s
p
e
c
t
t
h
e
c
o
n
t
e
n
t
s
o
f
t
h
e
k
i
t
.
0
1
2
3
4
5
1
2
4
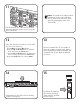
2
F
r
o
m
t
h
e
O
p
e
r
a
t
o
r
C
o
n
t
r
o
l
P
a
n
e
l
(
O
C
P
)
,
p
o
w
e
r
o
f
f
t
h
e
d
r
i
v
e
t
o
b
e
r
e
p
l
a
c
e
d
.
a
.
F
r
o
m
M
e
n
u
,
s
e
l
e
c
t
t
h
e
O
p
s
b
u
t
t
on
.
b
.
U
s
e
t
h
e
U
p
a
n
d
D
o
w
n
b
u
t
t
o
n
s
t
o
s
e
l
e
c
t
t
h
e
d
r
i
v
e
,
t
h
e
n
p
r
e
s
s
t
h
e
S
e
l
e
c
t
b
u
t
t
o
n
.
c
.
U
s
e
t
h
e
U
p
a
n
d
D
o
w
n
b
u
t
t
o
n
s
t
o
c
h
a
n
g
e
t
h
e
d
r
i
v
e
t
o
o
f
f
-
l
i
n
e,
t
h
e
n
p
r
e
s
s
t
h
e
S
e
l
e
c
t
b
u
t
t
o
n
.
d
.
S
e
l
e
c
t
t
h
e
B
a
c
k
b
u
t
t
o
n
t
o
r
e
t
u
r
n
t
o
M
e
n
u
.
e
.
V
e
r
i
f
y
t
h
a
t
t
h
e
c
o
rr
e
c
t
d
r
i
v
e
i
s
p
o
w
e
r
e
d
d
o
w
n
.
E
S
L
E
-
S
e
ri
e
s
U
lt
r
i
u
m
4
6
0
N
F
C
D
r
i
v
e
R
e
p
l
a
c
e
m
e
n
t
C
au
tio
n:
Par
ts can b
e
d
am
ag
e
d
by
e
le
c
tr
o
s
t
a
t
ic discharge
.
Keep p
a
r
t
s i
n
t
h
eir
co
n
ta
i
n
ers
u
n
til ne
e
d
ed
.
E
ns
u
r
e
y
ou are
p
rop
e
rl
y
g
rounded
w
h
e
n t
ou
c
h
i
n
g
s
tatic-
s
en
s
i
t
i
ve
components.
Note: T
h
i
s
pa
r
t
is
n
ot
hot
-plugg
a
b
le.
It is
nec
e
ss
a
ry
to power
o
ff the
driv
e
befo
r
e
r
ep
l
a
cement.
2
3
1
Dr
iv
e
c
l
us
t
er
s
a
r
e
nu
mber
ed from
0
t
o 5
sta
r
t
in
g
at
the
t
o
p
of
t
h
e c
a
b
ine
t
.
In
ea
c
h
dr
iv
e
clus
te
r
the
dr
iv
e
s
are
i
d
e
nt
i
f
i
ed as
foll
o
ws
:
top
r
i
gh
t
is A,
t
op
l
ef
t is
B,
b
o
t
t
o
m
r
i
ght
is
C,
b
o
t
to
m
l
ef
t
is
D
.
A
d
r
a
wi
ng
of
t
h
e
d
r
iv
e
c
l
uster
is
lo
ca
t
e
d
on
t
he
in
s
i
de of
t
he
b
a
ck
do
o
r
.
Open
the
bac
k door o
f
t
he
l
ib
rary.I
nspe
c
t
t
h
e
cont
ents
of
t
he
kit
.
0
1
2
3
4
5
4
I
d
e
n
t
if
y
t
he
dr
ive
to
be
r
e
p
la
ce
d
.
The
LED
of
t
h
e
d
riv
e
to
b
e
r
ep
la
ce
d wi
ll
b
e
of
f
.
CA
UTIO
N
: To
a
vo
i
d
da
ma
g
i
ng
t
h
e
d
r
i
ve
,
do
n
ot
r
em
ove
i
t if
the
LE
D
i
s
s
ti
l
l lit.
Se
es
t
e
p
2
to
p
o
w
er
o
f
f
t
he
d
r
i
v
e.
Caution: Parts can be damaged by
electrostatic discharge. Keep parts in their
containers until needed. Ensure you are
properly grounded when touching static-
sensitive components.
Note: This part is not hot-pluggable.
It is necessary to power off the drive before
replacement.
2
3
1
Drive clusters are
numbered from 0 to 5
starting at the top
of the cabinet. In
each drive cluster
the drives are
identified as
follows: top right
is A, top left is B,
bottom right is C,
bottom left is D.
A drawing of
the drive cluster is
located on the
inside of the back door.
Open the back door of the library.Inspect the contents of the kit.
0
1
2
3
4
5
4
Identify the drive to be replaced.
The LED of the drive to be replaced will be off.
CAUT ION: To avoid damaging the drive,
do not remove it if the LED is still lit.
See step 2 to power off the drive.