
HP StorageWorks ESL E-Series Ultrium 1840 and Ultrium 3280 FC Tape Drive Upgrade or Replacement (AH194-96006, November 2010)


22. Make sure that the tape drive has the latest firmware for correct
operation. If necessary, upgrade the drive firmware using the
Command View TL firmware upgrade wizard or the Interface
Manager card CLI. See the HP StorageWorks Interface Manager
and Command View TL User Guide for detailed procedures on
upgrading drive firmware.
NOTE:
After a drive replacement, you may also be required to run
specific OS commands from the HPUX host in order to verify
the drive path. See Ensure the new drive is CLAIMED and online.
Section 5—Replacing an LTO4 or LTO5
tape drive, or upgrading an LTO4 to an
LTO5 tape drive
1. If upgrading to an LTO5 tape drive, upgrade the firmware for all
library components so they will recognize the LTO5 tape drive.
2. Unload any tape cartridges from the drive to be removed using
your application software or the library Operator Control Panel
(OCP). Use your backup software to stop library activity.
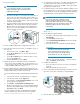
3. Open the back door of the library.
4. Identify the tape drive to be replaced. The LED of the drive to be
replaced will be off.
CAUTION:
To avoid damaging the drive, do not remove it if the
LED is still lit. Power off the tape drive from the OCP
before removing it.
5. Use the OCP to power off the tape drive.
a. From the Home screen, select Menu > Ops.
b. Use the Up and Down buttons to select the drive, then press
the Select button.
c. Use the Up and Down buttons to change the drive to off, then
press the Select button.
d. Select Yes to confirm.
e. Select the Back button to return to Menu.
f. Verify that the correct drive is powered off.
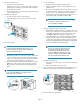
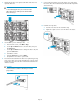
6. Disconnect the Fibre Channel (FC) cable from the drive to be
replaced by pressing down on the cable connector tab and pulling
the connector away from the drive.
7. Disconnect the Ethernet cable.
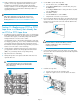
8. Using a slotted screwdriver, loosen the captive screw at the upper
left corner of the drive module. Grasp the drive handle and pull the
drive from its bay.
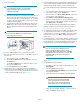
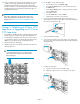
9. Install the new tape drive.
a. Insert the new drive into the vacant drive bay.
b. Tighten the captive screw to secure the drive to the cluster.
Page 10