
HP StorageWorks ESL E-Series Interface Manager card CompactFlash replacement instructions (368005-009, August 2008)


Power off the library
10127
ACT/
LNK
ACT/
LNK
PO R T 1 PO R T 0 ETHERNET
SERIAL
PWR
FIBRE
CHANNEL
FIBRE
CHANNEL
ACT/
LNK
PO R T 2
FIBRE
CHANNEL
ACT/
LNK
ACT/
LNK
PO R T 1 PO R T 3
FIBRE
CHANNEL
FIBRE
CHANNEL
ACT/
LNK
PO R T 2
FIBRE
CHANNEL
ACT/
LNK
ACT/
LNK
PO R T 1 PO R T 0 ETHERNET
SERIAL
PWR
FIBRE
CHANNEL
FIBRE
CHANNEL
ACT/
LNK
PO R T 2
FIBRE
CHANNEL
ACT/
LNK
ACT/
LNK
PO R T 1 PO R T 3
FIBRE
CHANNEL
FIBRE
CHANNEL
ACT/
LNK
PO R T 2
FIBRE
CHANNEL
ACT/
LNK
ACT/
LNK
PO R T 1 PO R T 0 ETHERNET
SERIAL
PWR
FIBRE
CHANNEL
FIBRE
CHANNEL
ACT/
LNK
PO R T 2
FIBRE
CHANNEL
ACT/
LNK
ACT/
LNK
PO R T 1 PO R T 3
FIBRE
CHANNEL
FIBRE
CHANNEL
ACT/
LNK
PO R T 2
FIBRE
CHANNEL
ACT/
LNK
ACT/
LNK
PO R T 1 PO R T 0 ETHERNET
SERIAL
PWR
FIBRE
CHANNEL
FIBRE
CHANNEL
ACT/
LNK
PO R T 2
FIBRE
CHANNEL
ACT/
LNK
ACT/
LNK
PO R T 1 PO R T 3
FIBRE
CHANNEL
FIBRE
CHANNEL
ACT/
LNK
PO R T 2
FIBRE
CHANNEL
ACT/
LNK
ACT/
LNK
PO R T 1 PO R T 0 ETHERNET
SERIAL
PWR
FIBRE
CHANNEL
FIBRE
CHANNEL
ACT/
LNK
PO R T 2
FIBRE
CHANNEL
ACT/
LNK
ACT/
LNK
PO R T 1 PO R T 3
FIBRE
CHANNEL
FIBRE
CHANNEL
ACT/
LNK
PO R T 2
FIBRE
CHANNEL
ACT/
LNK
ACT/
LNK
PO R T 1 PO R T 0 ETHERNET
SERIAL
PWR
FIBRE
CHANNEL
FIBRE
CHANNEL
ACT/
LNK
PO R T 2
FIBRE
CHANNEL
ACT/
LNK
ACT/
LNK
PO R T 1 PO R T 3
FIBRE
CHANNEL
FIBRE
CHANNEL
ACT/
LNK
PO R T 2
FIBRE
CHANNEL
ACT/
LNK
ACT/
LNK
PO R T 1 PO R T 0 ETHERNET
SERIAL
PWR
FIBRE
CHANNEL
FIBRE
CHANNEL
ACT/
LNK
PO R T 2
FIBRE
CHANNEL
ACT/
LNK
ACT/
LNK
PO R T 1 PO R T 3
FIBRE
CHANNEL
FIBRE
CHANNEL
ACT/
LNK
PO R T 2
FIBRE
CHANNEL
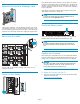
Flip the two breaker swi tches off (to the left) at the power distribution
unit.
Identify the
Interface Manager card
ACT/
LNK
ACT/
LNK
PO R T 1 PO R T 0 ETHERNET
SERIAL
PWR
FIBRE
CHANNEL
FIBRE
CHANNEL
ACT/
LNK
PO R T 2
FIBRE
CHANNEL
ACT/
LNK
ACT/
LNK
PO R T 1 PO R T 3
FIBRE
CHANNEL
FIBRE
CHANNEL
ACT/
LNK
PO R T 2
FIBRE
CHANNEL
ACT/
LNK
ACT/
LNK
PO R T 1 PO R T 0 ETHERNET
SERIAL
PWR
FIBRE
CHANNEL
FIBRE
CHANNEL
ACT/
LNK
PO R T 2
FIBRE
CHANNEL
ACT/
LNK
ACT/
LNK
PO R T 1 PO R T 3
FIBRE
CHANNEL
FIBRE
CHANNEL
ACT/
LNK
PO R T 2
FIBRE
CHANNEL
ACT/
LNK
ACT/
LNK
PO R T 1 PO R T 0 ETHERNET
SERIAL
PWR
FIBRE
CHANNEL
FIBRE
CHANNEL
ACT/
LNK
PO R T 2
FIBRE
CHANNEL
ACT/
LNK
ACT/
LNK
PO R T 1 PO R T 3
FIBRE
CHANNEL
FIBRE
CHANNEL
ACT/
LNK
PO R T 2
FIBRE
CHANNEL
ACT/
LNK
ACT/
LNK
PO R T 1 PO R T 0 ETHERNET
SERIAL
PWR
FIBRE
CHANNEL
FIBRE
CHANNEL
ACT/
LNK
PO R T 2
FIBRE
CHANNEL
ACT/
LNK
ACT/
LNK
PO R T 1 PO R T 3
FIBRE
CHANNEL
FIBRE
CHANNEL
ACT/
LNK
PO R T 2
FIBRE
CHANNEL
ACT/
LNK
ACT/
LNK
PO R T 1 PO R T 0 ETHERNET
SERIAL
PWR
FIBRE
CHANNEL
FIBRE
CHANNEL
ACT/
LNK
PO R T 2
FIBRE
CHANNEL
ACT/
LNK
ACT/
LNK
PO R T 1 PO R T 3
FIBRE
CHANNEL
FIBRE
CHANNEL
ACT/
LNK
PO R T 2
FIBRE
CHANNEL
ACT/
LNK
ACT/
LNK
PO R T 1 PO R T 0 ETHERNET
SERIAL
PWR
FIBRE
CHANNEL
FIBRE
CHANNEL
ACT/
LNK
PO R T 2
FIBRE
CHANNEL
ACT/
LNK
ACT/
LNK
PO R T 1 PO R T 3
FIBRE
CHANNEL
FIBRE
CHANNEL
ACT/
LNK
PO R T 2
FIBRE
CHANNEL
ACT/
LNK
ACT/
LNK
PO R T 1 PO R T 0 ETHERNET
SERIAL
PWR
FIBRE
CHANNEL
FIBRE
CHANNEL
ACT/
LNK
PO R T 2
FIBRE
CHANNEL
ACT/
LNK
ACT/
LNK
PO R T 1 PO R T 3
FIBRE
CHANNEL
FIBRE
CHANNEL
ACT/
LNK
PO R T 2
FIBRE
CHANNEL
10027a
The Inter
face Ma nager card is located either in the bottom slot of the
card cage, or in the top cluster, to the immediate right of the cluster
controller.
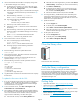
Unplug the cable
10028a
Note the loc ation of the cable connected to the Interface Manager
card, and then unplug the cable.
Remove the Interface Manager card
10541a
Note the orientation of the I nterface Manager card so you can replace
it in the sa me orientation. Use a #1 Phillips screwdriver to loosen the
captive screws in the black ejector handles at the ends of the Interface
Manager card. Push the ejector handles to the outside, then pull on
them to remove the card.
CAUTION:
Be aware that the metal tabs on the gasket on the filler panel can
be caught and bent by the pins on the I nterface Manager card.
If bent, these tabs can cause a short circuit. Avoid removing or
installing the Interface Manager card at an angle and watch that
the metal tabs on the gasket do not get caught or bent.
Remove the original CompactFlash card
10032a
Grasp th
e edges of the CompactFlash card and slide it out of the flash
memory slot. If needed, push a pen into the corner notches of th e
CompactFlash slot to unseat it.
Insert the new CompactFlash card
10033a
With the connector going in first, align the sides of the CompactFlash
card with the slot on the Interface Manager card. Gently slide the
CompactFlash card into the slot until it is securely seated. If the
CompactFlash card does not slide in easily, it is upside down.
Page 2