
HP StorageWorks ESL E-Series e2400-160 Interface Controller Upgrade (February 2004)


ACT/
LNK
ACT/
LNK
PORT 1 PORT 0 ETHERNET
SERIAL
PWR
FIBRE
CHANNEL
FIBRE
CHANNEL
ACT/
LNK
ACT/
LNK
PORT 1 PORT 0 ETHERNET
SERIAL
PWR
FIBRE
CHANNEL
FIBRE
CHANNEL
ACT/
LNK
ACT/
LNK
PORT 1 PORT 0 ETHERNET
SERIAL
PWR
FIBRE
CHANNEL
FIBRE
CHANNEL
ACT/
LNK
ACT/
LNK
PORT 1 PORT 0 ETHERNET
SERIAL
PWR
FIBRE
CHANNEL
FIBRE
CHANNEL
10 11
12
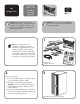
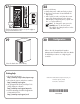
Route the cable through the
cable access holes in the sheet
metal on the right of the library
cabinet.
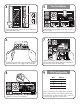
For drive clusters 0 through 2,
dip the excess cable length
down into the upper cable
access hole. For drive clusters 3
through 5, route the cables up through the lower
and upper access holes. Push the first set of cables
to the back of the library to create space for
additional cables. This will help prevent the cables
from becoming tangled.
Continue routing the cable up through the cable
restraint bracket located to the right of the card
cage.
ACT/
LNK
ACT/
LNK
PORT 1 PORT 0 ETHERNET
SERIAL
PWR
FIBRE
CHANNEL
FIBRE
CHANNEL
ACT/
LNK
ACT/
LNK
PORT 1 PORT 0 ETHERNET
SERIAL
PWR
FIBRE
CHANNEL
FIBRE
CHANNEL
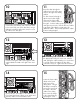
13
Connect the high density end of the SCSI cable to
the appropriate SCSI port on the new controller
card, pulling the cable toward you to ensure there
is enough slack in the cable to fit the cable
connector to the port. Tighten the left screw first.
14
Connect all four SCSI cables in the same manner.
If you have fewer than 4 drives, route cables and
leave the cables unconnected at this time.
PORT 1
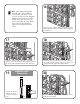
15
Locate the cluster cable
clamp on the lower
right corner of the
cluster frame. Using a
#2 Phillips screwdriver,
remove the screw from
the clamp. Place the
cables in the clamp,
then secure the clamp
to the cluster frame by
replacing the screw.
Connect the lower-density end of the SCSI cable
to the lower SCSI port on the drive then, using a
flathead screwdriver, tighten the screws to secure
the cable to the drive port.