
HP StorageWorks ESL E-Series e2400-160 Interface Controller Upgrade (February 2004)

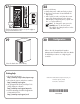

SCSI Configuration
ACT/
LNK
ACT/
LNK
PORT 1 PORT 0 ETHERNET
SERIAL
PWR
FIBRE
CHANNEL
FIBRE
CHANNEL
Card Installation
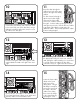
Hold the new controller’s ejector handles so they
extend towards the outer edges of the controller.
ACT/
LNK
ACT/
LNK
PORT 1 PORT 0 ETHERNET
SERIAL
PWR
FIBRE
CHANNEL
FIBRE
CHANNEL
ACT/
LNK
ACT/
LNK
PORT 1 PORT 0 ETHERNET
SERIAL
PWR
FIBRE
CHANNEL
FIBRE
CHANNEL
ACT/
LNK
ACT/
LNK
PORT 1 PORT 0 ETHERNET
SERIAL
PWR
FIBRE
CHANNEL
FIBRE
CHANNEL
5
67
8
With the SCSI ports located to your right as you
face the back of the library, slide the controller into
the now-open slot in the card cage.
9
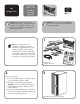
Using a #2 Phillips screwdriver, remove the blank
plate from the next available of the top six slots in
the card cage.
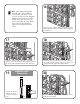
Tighten the captive screws on the new interface
controller to secure it to the library.
4
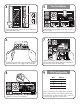
Flip the two breaker switches off (to the left) at the
power distribution unit.
Plan to connect the SCSI cables first to the drive,
then to the controller in the following order:drive
D to SCSI port 3, drive B to SCSI port 1, drive C
to SCSI port 2, drive A to SCSI port 0.
Drive SCSI Port
D3
B1
C2
A0