
Enterprise Volume Manager (Multi-OS) Host Agent Version 2.0D for IBM AIX Installation Guide


Installing the EVM Host Agent
2–9Enterprise Volume Manager (Multi-OS) Host Agent Version 2.0D for IBM AIX
Installation Guide
2–9
9. Press Enter to confirm the Management Appliance name or IP address; enter n
to return to step 8 and reenter a Management Appliance name or IP address.
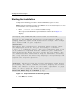
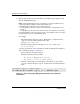
When the Management Appliance name or IP address is accepted, a prompt to set
the UNMOUNTVGSOURCE option displays (see Figure 2–8).
Figure 2–8: Prompt for setting the UNMOUNTVGSOURCE option
10. Press Enter to allow the script to leave the mount points and volume groups
unaffected before the copy; enter true or t to allow the script to unmount all
involved mount points and export all volume groups, to ensure that all files are
quiesced before the copy.
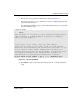
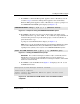
A prompt to start the EVM daemons displays (see Figure 2–9).
NOTE: Refer to the HP StorageWorks Enterprise Volume Manager (Multi-OS) Host Agent
Version 2.0D for IBM AIX Release Notes (AA–RTBCA–TE) for additional information
regarding the false (default) or true response to the UNMOUNTVGSOURCE question.
Figure 2–9: Starting the EVM daemons prompt
IMPORTANT: HP recommends allowing the installation script to automatically start the
EVM daemons. Choosing not to start the EVM daemons now means that this host
computer cannot communicate with the EVM server following the installation, until the EVM
daemons are started manually.
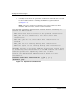
11. Press Enter to start the EVM daemons (Figure 2–10 displays); enter n to start
the EVM daemons later.
Figure 2–10: Confirmation of EVM daemon status and EVM installation
completion
UNMOUNTVGSOURCE entry? [ t|f ] [ ? ] (default= false):
Start the EVM daemons now? [ y|n ] [ ? ] (default= yes):
Enterprise Volume Manager daemons started.
Installation complete
Please consult the SANworks EVM host agent release notes
before running EVM.