hp StorageWorks Application Notes – Data Replication Manager with HP Tru64 UNIX Logical Storage Manager Part Number: AA-RQ79C-TE Second Edition (July 2002) Product Version: ACS Version 8.7P This document provides a general description of how HP Logical Storage Manager (LSM) interacts with the HP StorageWorks Data Replication Manager on the HP Tru64 UNIX V5.1a operating system.
© Hewlett-Packard Company, 2002. All rights reserved. Hewlett-Packard Company makes no warranty of any kind with regard to this material, including, but not limited to, the implied warranties of merchantability and fitness for a particular purpose. Hewlett-Packard shall not be liable for errors contained herein or for incidental or consequential damages in connection with the furnishing, performance, or use of this material. This document contains proprietary information, which is protected by copyright.
Application Notes Contents Application Notes Contents These application notes cover the following major topics: • Intended Audience, page 3 • Other Documentation, page 4 • Introduction, page 5 — Data Replication Manager Overview, page 5 — LSM Overview, page 6 — Definitions of Logical Storage Manager Terms, page 6 • DRM Configuration Variations, page 6 — LSM Configuration Caution, page 6 — Initializing LSM with the volsetup Utility, page 6 • Administering LSM, page 9 — Logical Storage Manager Stora
HP StorageWorks Technical Support Other Documentation This document references the following HP documents: • hp StorageWorks Data Replication Manager HSG80 ACS Version 8.7P Scripting User Guide, part number EK-DRMSC-OA. D01 • hp StorageWorks Data Replication Manager HSG80 ACS Version 8.7P Failover/Failback Procedures Guide, part number AA-RPJOD-TE The following documents may be useful to learn more about DRM and LSM: • hp StorageWorks Data Replication Manager HSG80 ACS Version 8.
Introduction • Elsewhere, see the HP website for locations and telephone numbers. Introduction HP Tru64 UNIX storage area network (SAN) administrators use Logical Storage Manager (LSM) to administer storage on their DRM solution. LSM groups the storage into pools of free space, called disk groups, which can then be divided into mountable volumes. This document shows how to administer DRM-based storage under the Logical Storage Manager Storage Administrator (LSMSA).
DRM Configuration Variations LSM Overview LSM is an online storage management tool for enterprise computing and SAN environments. It allows online administration from a GUI for disk storage configurations. Through the support of RAID redundancy techniques, LSM protects against disk and hardware failures and lets users extend the capabilities of existing hardware.
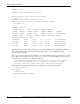
DRM Configuration Variations • Prepares the system to start LSM upon system reboot • Starts the vold and voliod daemons NOTE: You do not have to use the rootdg disk group for volume creation, but you must have a rootdg disk group before you can create any other disk groups. IMPORTANT: The disk used for the rootdg cannot be part of a remote copy set.
DRM Configuration Variations CONTINUE ? [y/n] < y > Addition of disk dsk9b as dsk9b succeeded. Add disk dsk10b to the root disk group as dsk10b: Addition of disk dsk10b as dsk10b succeeded. Initialization of vold and the root disk group was successful.
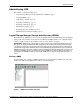
Administering LSM Administering LSM This section covers the following topics: • Logical Storage Manager Storage Administrator (LSMSA), page 9 • Starting LSMSA, page 9 • Unmounting a Volume, page 10 • Deporting a Disk Group, page 11 • Importing a Disk Group, page 12 • Mounting the Volume, page 13 • Importing with a Forced Import, page 14 • Mounting the Forced Import Volume, page 15 Logical Storage Manager Storage Administrator (LSMSA) The LSM Storage Administrator is the tool recommended and
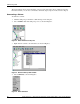
Administering LSM The main window shows a hierarchical list of objects and a grid of the objects and their properties. From this window you can select commands to unmount, deport, import, mount, and force import. Unmounting a Volume To unmount a volume: 1. Click the disk group to which the volume belongs, in the left pane. 2. Select Volumes under that disk group’s icon, as shown in Figure 2. Figure 2: Select Volumes in left pane 3. Right-click the volume to be unmounted, as shown in Figure 3.
Administering LSM 5. You will see a display similar to the one shown in Figure 5. Figure 5: Unmount File System confirmation window 6. Click OK to unmount the volume. Deporting a Disk Group To deport a disk group: 1. Right-click the disk group. 2. Select Deport, as shown in Figure 6. Figure 6: Deport Disk Groups window 3. When the disk group is deported, you can disable host access from the controllers and continue with the failover or failback operation.
Administering LSM Importing a Disk Group To import a disk group: 1. Right-click Disk Groups, as shown in Figure 8. Figure 8: Import Disk Group window 2. Select Import Disk Group, as shown in Figure 9. A dialog box will be displayed, as shown in Figure 10. Figure 9: Select Import Disk Group 3. Click Browse, as shown in Figure 10.
Administering LSM 4. Select the disk group to be imported, then click OK, as shown in Figure 11. Figure 11: Browse Disk Groups window 5. You will see a display similar to that in Figure 12. Figure 12: Import Disk Group confirmation window 6. Click OK to import the disk group. Mounting the Volume After the disk group is imported, you can mount the volume: 1. In the left pane, select Volumes for the disk group that contains the volume you want to mount, as shown in Figure 13.
Administering LSM 2. Right-click the volume (listed in the right pane) that you wish to mount, as shown in Figure 14. Figure 14: Select and right-click volume 3. Choose Mount, as shown in Figure 15. Figure 15: Choose Mount from menu A display similar to the one shown in Figure 16 will appear. 4. Click OK to mount the volume, as shown in Figure 16.
Administering LSM 2. Select the boxes for Clear Host ID and Force Import, as shown in Figure 17, then browse for your disk group. Figure 17: Force Import Disk Group window 3. Click OK to force import of the disk group. Mounting the Forced Import Volume 1. Right-click the Volumes folder (in the left-pane under the Disk Groups tree). Figure 18: Mount window 2. Select Mount, as shown in Figure 19. You will see a display similar to the one shown in Figure 20. Figure 19: Select Mount 3.
Augmented Failover, Failback, and Role Reversal Procedures Augmented Failover, Failback, and Role Reversal Procedures This section covers the following topics: • All Procedures Description, page 16 • Augmented Procedures with Scripts, page 16 • Augmented Procedures with Command Line Interpreter, page 18 When LSM is used to manage your storage units, special handling of the volumes is required before and after the failover, failback, and role reversal procedures.
Augmented Failover, Failback, and Role Reversal Procedures • On page 6-7, perform the following additional initiator site tasks at the end of the HP Tru64 UNIX-specific operations in step 2b: Import the disk groups. Start the volumes, if not already started, then mount the volumes. Chapter 7: Resumption of Operations After Unplanned Loss of Target Site Procedure (Failsafe Mode) No additional steps are required.
Augmented Failover, Failback, and Role Reversal Procedures Chapter 12: Unplanned Site Failover With Failback To New Hardware Procedure • On page 12-4, perform the following additional target site tasks at the end of the HP Tru64 UNIX-specific operations in step 3b: Import the disk groups using the forced import, with the clear host ID flag. Start the volumes, if not already started, then mount the volumes.
Augmented Failover, Failback, and Role Reversal Procedures Chapter 3: Resumption of Operations After Unplanned Loss of Target Site Procedure (Failsafe Mode) No additional steps are required. Chapter 4: Resumption of Operations After Unplanned Loss of Target Site Procedure (Normal Mode) No additional steps are required.
Augmented Failover, Failback, and Role Reversal Procedures Chapter 9: Unplanned Site Failover With Failback To New Hardware Procedure • On page 9-10, perform the following additional target site tasks at the end of the HP Tru64 UNIX-specific operations in step 15b: Import the disk groups using the forced import, with the clear host ID flag. Start the volumes, if not already started, then mount the volumes.