
FW 08.01.00/HAFM SW 08.06.xx or later HP StorageWorks Edge Switch 2/24 Installation Guide (AA-RTDWE-TE, November 2005)
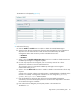

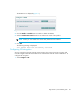


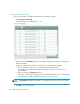


Table Of Contents
- Edge Switch 2/24 installation guide
- Contents
- Introduction to the Edge Switch 2/24
- Installing the Edge Switch
- Connecting the Edge Switch
- Edge Switch network addresses
- LAN-connecting the Edge Switch
- Setting up the HAFM appliance
- Using HAFM to configure the Edge Switch
- Setting the Edge Switch online and offline
- Configuring Edge Switch identification
- Configuring Edge Switch operating parameters
- Configuring fabric operating parameters
- Configuring switch binding
- Configuring preferred path
- Configuring ports
- Configuring SNMP trap message recipients
- Configuring, enabling, and testing e-mail notification
- Configuring and enabling call-home features
- Configuring and enabling Ethernet events
- Configuring, enabling, and testing call-home event notification
- Threshold alerts
- Creating new alerts
- Figure 30 Configure Threshold Alerts dialog box
- Figure 31 New Threshold Alerts dialog box-first screen
- Figure 32 New Threshold Alerts dialog box-second screen
- Figure 33 New Threshold Alerts dialog box-third screen
- Figure 34 New Threshold Alerts dialog box-summary screen
- Figure 35 Configure Threshold Alerts dialog box-alert activated
- Modifying alerts
- Activating or deactivating alerts
- Deleting alerts
- Creating new alerts
- Configuring SANtegrity Authentication
- Backing up HAFM configuration data
- Resetting configuration data
- Enabling the HAFM Basic interface
- Enabling Telnet
- Connecting the Edge Switch to a fabric
- Using the HAFM Basic interface
- Launching the HAFM Basic interface
- Setting the Edge Switch offline and online
- Configuring Edge Switch ports
- Configuring BB credit
- Configuring Edge Switch identification
- Configuring date and time
- Configuring Edge Switch parameters
- Configuring network information
- Configuring SNMP trap message recipients
- Enabling or disabling the CLI
- Configuring zoning
- Managing firmware versions
- Regulatory compliance and safety
- Technical specifications
- Index

Edge Switch 2/24 installation guide 81
The SNMP view is displayed (Figure 49).
Figure 49 SNMP view
2. Perform the following:
a. Click the Enable or Disable button to enable or disable the installed SNMP agent.
b. Select the Fibre Alliance management information base (FA MIB) from the FA MIB Version
drop-down list. This should be set to match the level of FA MIB used by the SNMP
management stations that access the product. Available selections are:
•FA MIB 3.0
•FA MIB 3.1
c. Select or clear the Enable Authentication Traps check box to enable or disable transmission
of SNMP trap messages to configured recipients.
d. For each trap recipient to be configured, enter a community name of 32 or fewer
alphanumeric characters in the associated Name box.
The community name is incorporated in SNMP trap messages to ensure against
unauthorized viewing or use.
e. Select or clear the Write Auth check box to enable or disable write authorization for the trap
recipient.
A check mark in the box indicates write authorization is enabled (default is disabled). When
the feature is enabled, a management workstation user can change the sysContact,
sysName, and sysLocation SNMP variables.
f. Enter the IP address or DNS host name of the trap recipient (SNMP management
workstation) in the associated Trap Recipient box. Use 64 or fewer alphanumeric characters.
HP recommends using the IP address.
g. Enter a decimal user datagram protocol (UDP) number in the UDP Port box.
The default is 162.