
FW 08.01.00/HAFM SW 08.06.xx or later HP StorageWorks Edge Switch 2/24 Installation Guide (AA-RTDWE-TE, November 2005)

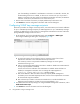

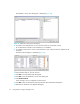

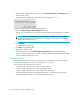


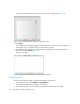
Table Of Contents
- Edge Switch 2/24 installation guide
- Contents
- Introduction to the Edge Switch 2/24
- Installing the Edge Switch
- Connecting the Edge Switch
- Edge Switch network addresses
- LAN-connecting the Edge Switch
- Setting up the HAFM appliance
- Using HAFM to configure the Edge Switch
- Setting the Edge Switch online and offline
- Configuring Edge Switch identification
- Configuring Edge Switch operating parameters
- Configuring fabric operating parameters
- Configuring switch binding
- Configuring preferred path
- Configuring ports
- Configuring SNMP trap message recipients
- Configuring, enabling, and testing e-mail notification
- Configuring and enabling call-home features
- Configuring and enabling Ethernet events
- Configuring, enabling, and testing call-home event notification
- Threshold alerts
- Creating new alerts
- Figure 30 Configure Threshold Alerts dialog box
- Figure 31 New Threshold Alerts dialog box-first screen
- Figure 32 New Threshold Alerts dialog box-second screen
- Figure 33 New Threshold Alerts dialog box-third screen
- Figure 34 New Threshold Alerts dialog box-summary screen
- Figure 35 Configure Threshold Alerts dialog box-alert activated
- Modifying alerts
- Activating or deactivating alerts
- Deleting alerts
- Creating new alerts
- Configuring SANtegrity Authentication
- Backing up HAFM configuration data
- Resetting configuration data
- Enabling the HAFM Basic interface
- Enabling Telnet
- Connecting the Edge Switch to a fabric
- Using the HAFM Basic interface
- Launching the HAFM Basic interface
- Setting the Edge Switch offline and online
- Configuring Edge Switch ports
- Configuring BB credit
- Configuring Edge Switch identification
- Configuring date and time
- Configuring Edge Switch parameters
- Configuring network information
- Configuring SNMP trap message recipients
- Enabling or disabling the CLI
- Configuring zoning
- Managing firmware versions
- Regulatory compliance and safety
- Technical specifications
- Index

Edge Switch 2/24 installation guide 51
• Enter a value in the RX BB Credit column to set minimum and maximum allowable port BB
credit values. These values vary by Director.
If an invalid value is entered, an Invalid RX BB Credit error message is displayed. The
BB Credit value is validated as entered.
Click Activate and a RX-BB Credit Confirmation box is displayed. In addition to the maximum
BB credit limit per port, the total BB credits allocated to all ports cannot exceed the buffer
pool size.
NOTE: Only 24-Port Edge Switches have a switch-wide buffer pool. The Configure Ports
dialog box displays the total and available buffers at the bottom of the dialog box. When
information is changed in the RX BB Credit column, the buffer information is also updated. If
information is entered that exceeds the buffer pool and Activate is clicked, an error message
is displayed. Also, ports for the 24-Port Edge Switches can be individually configured
between 2–12, with a total number of port credits of 150.
Right-clicking in the RX-BB Credit column displays an RX BB Credits dialog box. For Edge
Switches without buffer pools, this dialog box allows you to select Set all, which sets all ports
to a single value, or Set all to maximum, which sets all ports to a maximum BB credit value.
For Edge Switches with buffer pools, this dialog box allows you to select Set all, which sets all
ports to a single value, or Distribute, which evenly distributes the pool buffers among all
ports. Clicking OK changes the values in the Configure Port dialog box. Clicking Activate
changes the values on the Edge Switch.
d. Select or clear the LIN Alerts check box to enable or disable LIN alerts for a port.
A check mark in the box indicates alerts are enabled. When the feature is enabled and an
incident occurs on the link, an alert indicator (yellow triangle) is displayed at the Hardware
view, Port List view, and Port Card view; and a message is sent to configured e-mail
recipients. LIN alerts are enabled by default.
e. Click Type for a specified port and select generic port (G_Port), fabric port (F_Port), or
expansion port (E_Port) from the list box.
f. Click Speed for a specified port and select 1Gb/s, 2Gb/s, or Negotiate as the desired
setting, depending on the speed capability of the device to be plugged into the port.
TIP: Right-clicking in the Speed column allows you to select from a menu to set all ports to
1Gb/s, 2Gb/s, or Negotiate.
g. Select a Port Binding check box to enable WWN binding for the selected port. This allows
only a specific device to attach to the port. This device is specified by the WWN or
nickname entered into the Bound WWN column. With the check box cleared, any device
can attach to the port even if a WWN or nickname is specified in the Bound WWN column.
or
Enter a world wide name (WWN) in the Bound WWN box in the proper format
(xx.xx.xx.xx.xx.xx.xx.xx) or a nickname configured through the Element Manager
application. The device with this WWN or nickname will have exclusive attachment to the