
FW 08.01.00/HAFM SW 08.06.xx or later HP StorageWorks Edge Switch 2/24 Installation Guide (AA-RTDWE-TE, November 2005)

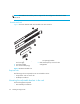


Table Of Contents
- Edge Switch 2/24 installation guide
- Contents
- Introduction to the Edge Switch 2/24
- Installing the Edge Switch
- Connecting the Edge Switch
- Edge Switch network addresses
- LAN-connecting the Edge Switch
- Setting up the HAFM appliance
- Using HAFM to configure the Edge Switch
- Setting the Edge Switch online and offline
- Configuring Edge Switch identification
- Configuring Edge Switch operating parameters
- Configuring fabric operating parameters
- Configuring switch binding
- Configuring preferred path
- Configuring ports
- Configuring SNMP trap message recipients
- Configuring, enabling, and testing e-mail notification
- Configuring and enabling call-home features
- Configuring and enabling Ethernet events
- Configuring, enabling, and testing call-home event notification
- Threshold alerts
- Creating new alerts
- Figure 30 Configure Threshold Alerts dialog box
- Figure 31 New Threshold Alerts dialog box-first screen
- Figure 32 New Threshold Alerts dialog box-second screen
- Figure 33 New Threshold Alerts dialog box-third screen
- Figure 34 New Threshold Alerts dialog box-summary screen
- Figure 35 Configure Threshold Alerts dialog box-alert activated
- Modifying alerts
- Activating or deactivating alerts
- Deleting alerts
- Creating new alerts
- Configuring SANtegrity Authentication
- Backing up HAFM configuration data
- Resetting configuration data
- Enabling the HAFM Basic interface
- Enabling Telnet
- Connecting the Edge Switch to a fabric
- Using the HAFM Basic interface
- Launching the HAFM Basic interface
- Setting the Edge Switch offline and online
- Configuring Edge Switch ports
- Configuring BB credit
- Configuring Edge Switch identification
- Configuring date and time
- Configuring Edge Switch parameters
- Configuring network information
- Configuring SNMP trap message recipients
- Enabling or disabling the CLI
- Configuring zoning
- Managing firmware versions
- Regulatory compliance and safety
- Technical specifications
- Index

Installing the Edge Switch28
NOTE: Before removing the power supplies, review the HP StorageWorks Edge Switch 2/24
service manual for details on removing power supplies.
To install the slide rails on the sides of the Edge Switch (Figure 7):
1. On the Edge Switch, remove the six screws (three screws per side) that help hold the Edge Switch
cover in place.
NOTE: Do not discard these screws, as you will use them to attach the slide rails.
2. Using the torque driver and the screws you removed earlier, attach the left and right slide rails to
the Edge Switch.
Figure 7 Attaching the slide rail to the Edge Switch
Installing the Edge Switch in the cabinet
Tools and equipment required:
• One #2 Phillips screwdriver
• Two rear spacing brackets
To install the Edge Switch in the cabinet:
1. From the front side of the cabinet, slide the Edge Switch into the mounting brackets and along
the rails until the rear of the Edge Switch is flush with the rear of the cabinet.
2. Bring the rear spacing brackets to the rear of the cabinet.
3. Pull the Edge Switch toward the rear of the cabinet until it protrudes approximately 3 inches.
4. Orient the rear spacing bracket mounts so that they are pointed outward. Insert the tabs on each
rear spacing bracket into the designated slots in each rail.
5. Push the Edge Switch forward using both rear spacing brackets until the rear spacing bracket
mounts contact the cabinet rail.
6. Attach the rear spacing brackets to the cabinet using two Phillips panhead screws (10-32 x 5/8)
with flat washers.