
FW 08.01.00/HAFM SW 08.06.xx or later HP StorageWorks Edge Switch 2/24 Installation Guide (AA-RTDWE-TE, November 2005)
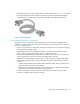

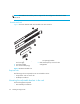


Table Of Contents
- Edge Switch 2/24 installation guide
- Contents
- Introduction to the Edge Switch 2/24
- Installing the Edge Switch
- Connecting the Edge Switch
- Edge Switch network addresses
- LAN-connecting the Edge Switch
- Setting up the HAFM appliance
- Using HAFM to configure the Edge Switch
- Setting the Edge Switch online and offline
- Configuring Edge Switch identification
- Configuring Edge Switch operating parameters
- Configuring fabric operating parameters
- Configuring switch binding
- Configuring preferred path
- Configuring ports
- Configuring SNMP trap message recipients
- Configuring, enabling, and testing e-mail notification
- Configuring and enabling call-home features
- Configuring and enabling Ethernet events
- Configuring, enabling, and testing call-home event notification
- Threshold alerts
- Creating new alerts
- Figure 30 Configure Threshold Alerts dialog box
- Figure 31 New Threshold Alerts dialog box-first screen
- Figure 32 New Threshold Alerts dialog box-second screen
- Figure 33 New Threshold Alerts dialog box-third screen
- Figure 34 New Threshold Alerts dialog box-summary screen
- Figure 35 Configure Threshold Alerts dialog box-alert activated
- Modifying alerts
- Activating or deactivating alerts
- Deleting alerts
- Creating new alerts
- Configuring SANtegrity Authentication
- Backing up HAFM configuration data
- Resetting configuration data
- Enabling the HAFM Basic interface
- Enabling Telnet
- Connecting the Edge Switch to a fabric
- Using the HAFM Basic interface
- Launching the HAFM Basic interface
- Setting the Edge Switch offline and online
- Configuring Edge Switch ports
- Configuring BB credit
- Configuring Edge Switch identification
- Configuring date and time
- Configuring Edge Switch parameters
- Configuring network information
- Configuring SNMP trap message recipients
- Enabling or disabling the CLI
- Configuring zoning
- Managing firmware versions
- Regulatory compliance and safety
- Technical specifications
- Index

Edge Switch 2/24 installation guide 25
• Adequate ventilation is present.
• Areas with excessive heat, dust, or moisture are avoided.
• All planning considerations are met. See the HP StorageWorks SAN high availability
planning guide.
3. Verify that all FRUs are installed as ordered.
4. Verify that the SFP optical transceivers are installed as required for your installation.
5. Connect the U.S. or country-specific (optional) AC power cords to the right (PS0) and left (PS1)
receptacles at the rear of the chassis.
WARNING! An HP-supplied power cord is provided for each Edge Switch power supply. To
prevent electric shock when connecting the Edge Switch to primary facility power, use only the
supplied power cords, and ensure that the facility power receptacle is the correct type, supplies the
required voltage, and is properly grounded.
6. Connect the remaining ends of the AC power cords to separate facility power sources that
provide single-phase, 120 to 240 volt alternating current (VAC) to ensure power redundancy.
7. Turn on the power.
The unit powers on and performs power-on self-tests (POSTs). During POSTs:
• The green power (PWR) LED on the front panel turns on.
• The amber system error (ERR) LED on the front panel flashes momentarily while the Edge
Switch is tested.
• The green LEDs associated with the Ethernet port flash momentarily while the port is tested.
• The green and amber LEDs associated with the ports flash momentarily while the ports are
tested.
After successful POST completion, the green power (PWR) LED remains on and all other front
panel LEDs turn off.
8. If a POST error or other malfunction occurs, see the Edge Switch service manual to isolate the
problem.
Installing the Edge Switch in a rack
This section describes how to mount the Edge Switch in one of the following rack types:
• HP 9000 series, 10000 series, or 11000 series
• HP rack system/e or 19-inch EIA
Rack mount checklist
This section describes the contents of the rack mount kit as well as tools or equipment required to
complete the installation.