
FW 08.01.00 McDATA Sphereon 4500 Fabric Switch Installation and Service Manual (620-000159-330, November 2005)


4-40
McDATA Sphereon 4500 Fabric Switch Installation and Service Manual
Repair Information
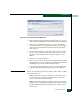
2. Select the radio button associated with the product management
style and enter the decimal port numbers (open systems style) or
hexadecimal port addresses (FICON style) of the ports to be
swapped. The FC Address fields update dynamically.
3. Click Next. The Instructions section of the dialog box indicates the
ports will be blocked.
4. Inform the customer a port swap is to be performed. Ensure the
system administrator quiesces Fibre Channel frame traffic
through the ports, varies any attached host offline, and sets any
attached device offline.
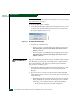
5. Click Next. Beaconing is enabled for both ports and both ports are
blocked. Swap the port fiber-optic cables as directed by the
system administrator.
6. Click Next. The Instructions section of the dialog box indicates the
port swap operation is complete and beaconing is disabled. Select
each Unblock check box to unblock the ports, then click Finish.
7. Ensure the system administrator varies any attached host online
and sets any attached device online.
8. Back up the product configuration data. Refer to Back Up
Configuration for instructions.
Collect
Maintenance Data
When firmware detects a critical error, the product automatically
copies the contents of DRAM to a dump area in FLASH memory on
the CTP card. Perform this procedure after a firmware fault or FRU
failure to capture data for analysis by support personnel.
Maintenance data includes the dump file and engineering logs.
NOTE: An optional full-volatility feature is often required at military sites
that process classified data. If the feature is enabled through a PFE key, a
memory dump file (that may include classified Fibre Channel frames) is not
included as part of the data collection procedure.
To collect maintenance data:
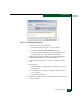
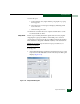
1. At the Element Manager application (management server), select
Data Collection from the Maintenance menu. The Save Data
Collection dialog box displays (Figure 4-16).