
FW 07.00.00/HAFM SW 08.06.00 HP StorageWorks Edge Switch 2/24 Installation Guide (AA-RTDWD-TE/958-000283-003, March 2005)


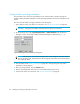


Table Of Contents
- Edge Switch 2/24 installation guide
- Contents
- Switch features
- Installing and configuring the Edge Switch 2/24
- Installation options
- Review installation requirements
- Unpack and Inspect the switch
- Install the Edge Switch on a desktop
- Install the Edge Switch in a rack
- Configure switch network information
- LAN-Connect the switch
- Configure the HAFM appliance
- Frequently used HAFM settings
- Set the switch online
- Set the switch offline
- Configure switch identification
- Configure switch operating parameters
- Configure fabric operating parameters
- Configure switch binding
- Configure SNMP trap message recipients
- Configure, enable, and test e-mail notification
- Configure and enable Ethernet events
- Configure call home event notification
- Configure threshold alerts
- Create new alerts
- Figure 25 Configure Threshold Alerts dialog box
- Figure 26 New Threshold Alerts dialog box-first screen
- Figure 27 New Threshold Alerts dialog box-second screen
- Figure 28 New Threshold Alerts dialog box-third screen
- Figure 29 New Threshold Alerts dialog box-summary screen
- Figure 30 Configure Threshold Alerts dialog box-alert activated
- Modify alerts
- Activate or deactivate alerts
- Delete alerts
- Create new alerts
- Configure SANtegrity authentication
- Back up HAFM configuration data
- Configure open systems management appliance
- Configure feature key
- Configure Open Trunking
- Enable Embedded Web Server
- Enable Telnet
- Connect cables to Fibre Channel ports
- Connect the switch to a fabric
- Unpack, inspect, and install the ethernet hub (optional)
- Using HAFM from a remote location
- Using the Embedded Web Server
- Manage firmware versions
- Regulatory compliance and safety
- Technical specifications
- Index

Edge Switch 2/24 installation guide 49
Fabric parameters
Configure the following parameters as required by your fabric.
R_A_TOV
Configure resource allocation time-out value (R_A_TOV) in tenth-of-a-second increments. This
variable works with the error detect time-out value (E_D_TOV) variable to control the switch’s
behavior when an error condition occurs. Resources are allocated to a circuit when errors are
detected and are not released for reuse until the time set by the R_A_TOV value expires. The default
value is 100 tenths (10 seconds). Set a value between 10 tenths and 1200 tenths (1 through 120
seconds).
NOTE: Set the same value for R_A_TOV on all directors and switches in a multiswitch fabric. If the
value is not the same on all units, the fabric segments. Also, the value for R_A_TOV must be greater
than the value configured for E_D_TOV.
E_D_TOV
Adjust the E_D_TOV in tenth-of-a-second increments. An error condition occurs when an expected
response is not received within the time limit set by this value. The default value is 20 tenths (2
seconds). Set a value between 2 tenths through 600 tenths (.2 through 60 seconds).
NOTE: Set the same value for E_D_TOV on all switches and directors in a multiswitch fabric. If the
value is not the same, the fabric segments. Also, the value for E_D_TOV must be less than the value
configured for R_A_TOV.
Switch priority
Setting this value determines the principal switch for the multiswitch fabric. Select Principal (highest
priority), Default, or Never Principal (lowest priority) from the Switch Priority drop-down list.
Setting these priority values determines the principal switch selected for the multiswitch fabric. For
example, if you have three switches in the fabric and set one as Principal, one as Default, and one
as Never Principal, the unit set to Principal becomes the principal switch in the fabric.
If all switches are set to Principal or Default, the switch with the highest priority and the lowest
WWN becomes the principal switch. Following are some examples of principal switch selection
when switches have these settings:
• If you have three switches and set all to Default, the switch with the lowest WWN becomes the
principal switch.
• If you have three switches and set two to Principal and one to Default, the switch with the
Principal setting that has the lowest WWN becomes the principal switch.
• If you have three switches and set two to Default and one to Never Principal, the switch with the
Default setting and the lowest WWN becomes the principal switch.