
FW 07.00.00/HAFM SW 08.06.00 McDATA Sphereon 4300 Fabric Switch Installation and Service Manual (620-000171-010, April 2005)


2
Installation Tasks
2-51
Installation Tasks
• Disable zone set - To disable the active zone set and place all
attached devices in the default zone, click Disable Zone Set. A
confirmation dialog box displays. Click OK to disable the
active zone set.
• Discard changes - To discard unsaved changes made to a zone
set configuration and revert to a saved zoning configuration,
click Discard Changes. A confirmation dialog box displays.
Click OK to discard the changes.
Task 7: Connect Switch to a Fabric Element (Optional)
To provide fabric-attached Fibre channel connectivity for devices
connected to the Sphereon 4300 Switch, connect the switch to an
expansion port (E_Port) of a fabric element (switch or director). Any
switch can be used to form this ISL. To connect the Sphereon 4300
Switch to a fabric element and create an ISL:
1. Ensure the fabric element is accessible by the SANpilot interface.
If the fabric element must be defined, refer to the appropriate
switch or director installation manual for instructions.
2. Ensure the preferred domain ID for the Sphereon 4300 Switch is
unique and does not conflict with the ID of another switch or
director participating in the fabric. Refer to Task 3: Configure the
Switch at the SANpilot Interface on page 2-6.
3. Ensure the R_A_TOV and E_D_TOV values for the Sphereon 4300
Switch are identical to the values for all switches or directors
participating in the fabric. Refer to Task 3: Configure the Switch at
the SANpilot Interface.
4. Route a multimode or singlemode fiber-optic cable (depending
on the type of transceiver installed) from a customer-specified
E_Port of the fabric element to the front of the switch.
5. Connect the director-attached fiber-optic cable to a Sphereon 4300
Switch port as directed by the customer.
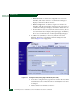
6. At the Configure panel, select the View option at the left side of the
panel. The View panel opens with the Switch page displayed.
7. Double-click the graphical port connector used for the fabric ISL
(connected in step 5).
8. The View panel opens with the Port Properties page displayed. Port
properties appear for the selected port.