
FW 07.00.00/HAFM SW 08.06.00 McDATA Sphereon 4300 Fabric Switch Installation and Service Manual (620-000171-010, April 2005)


Repair Information
4-21
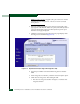
b. The message Diagnostics Time Remaining: xx appears,
where xx are the seconds remaining in the test. The test takes
approximately 30 seconds.
NOTE: Click Terminate Port Diagnostics at any time to abort the
loopback test.
7. When the test completes, results appear as Passed or Failed in the
message area of the dialog box.
8. Reset the tested port:
a. Click the Reset tab. The Port page displays with the Reset tab
selected.
b. For the tested port, click (enable) the check box in the Port
Reset column. A check mark in the box indicates the port reset
option is enabled.
c. Click Activate at the bottom of the page. The port resets and
the message Your changes have been successfully activated
appears.
9. Notify the customer the test is complete and the attached device
can be set online.
External Loopback
Test
To perform an external loopback at the SANpilot interface:
1. Notify the customer that a disruptive external loopback test is to
be performed and the attached device must be disconnected.
2. Disconnect the fiber-optic jumper cable from the port to be tested.
3. Depending on the port technology, insert a singlemode or
multimode loopback plug into the port receptacle.
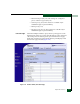
4. When the SANpilot interface opens, the View panel and Switch
page appear as the default. At the View panel, select the Operations
option at the left side of the panel. The Operations panel opens
with the Switch page displayed.
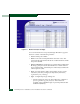
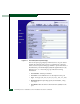
5. Click the Port and Diagnostics tabs. The Port page displays with
the Diagnostics tab selected (Figure 4-14 on page 4-20).
6. Type the port number to be tested in the Targeted Port Number
field.
7. At the Diagnostics Test list box, select the External Loopback option.