HP XP P9000 DKA Encryption User Guide Abstract This guide describes and provides instructions for using the HP XP P9000 DKA Encryption License Key software to configure and perform HP DKA Encryption License Key operations. The intended audience is a storage system administrator or authorized service provider with independent knowledge of HP XP P9000 disk arrays and the HP Remote Web Console.
© Copyright 2010, 2013 Hewlett-Packard Development Company, L.P. Confidential computer software. Valid license from HP required for possession, use or copying. Consistent with FAR 12.211 and 12.212, Commercial Computer Software, Computer Software Documentation, and Technical Data for Commercial Items are licensed to the U.S. Government under vendor's standard commercial license. The information contained herein is subject to change without notice.
Contents 1 DKA Encryption Overview...........................................................................6 DKA Encryption benefits............................................................................................................6 DKA Encryption support specifications.........................................................................................6 Primary and secondary data encryption license keys.....................................................................
Restoring keys from a key management server........................................................................24 Viewing backup data encryption license keys.............................................................................24 Data encryption license key change management workflow.........................................................24 Data encryption license key deletion workflow............................................................................
Delete Backup Keys on Server window......................................................................................48 View Backup Keys on Server window........................................................................................49 Backup Keys table..............................................................................................................50 Edit Encryption wizard.............................................................................................................
1 DKA Encryption Overview To guarantee the security of the data, use the DKA Encryption (EDKA) feature to store encrypted data in an LDEV and encrypt them. The EDKA feature provides redundant backup and restore capabilities to ensure data availability. DKA Encryption benefits Encrypting data can prevent information loss or leaks if a disk drive is physically removed from the system. Failure, loss, or theft are the most common reasons for information loss.
You can use the EDKA feature to back up data encryption license keys. The P9500 storage system automatically creates a primary backup of the data encryption license key, and stores this backup on each MP package. You can create a secondary backup data encryption license key. The secondary backup is required to restore the key if the primary backup is unavailable.
1. 2. 3. 4. Data in the parity group is backed up. Data encryption at the parity-group level is disabled. The LDEVs in the parity group are formatted. The LDEVs are unblocked. For more information about disabling encryption, see “Disabling data encryption at the parity-group level” (page 21). Change data encryption license key workflow You must migrate data to encrypt data with a different data encryption license key on the P9500 storage system.
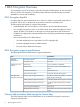
Interoperability with other software applications Use the following table to determine the interoperability of software applications with data encryption. Software application Interoperability notes Business Copy, Continuous Access Synchronous, Compatible FlashCopy, and Compatible XRC Encrypt the P-VOL and S-VOLs to ensure data security. Snapshot and Fast Snap Match the encryption states of the P-VOL and pool-VOL. If the P-VOL is encrypted, encrypt all of the pool-VOLs.
2 DKA Encryption Installation This chapter discusses how to install the EDKA feature. DKA Encryption installation workflow Use the following workflow to install the EDKA feature: 1. Ensure your system meets the system requirements. For more information about the system requirements, see “System requirements” (page 10). 2. 3. Ensure your product suite interoperates the way you want it to with the EDKA feature. Enable the EDKA feature.
Assigning users to user groups Assign administrator privileges to users in RWC by adding the users to a user group. A user’s membership to a user group determines the user’s level of permission. You change these permissions by changing the user’s membership to a user group. A user can belong to multiple user groups. You must have Security Administrator (View & Modify) role to assign or change a user’s role. 1. In RWC, in the resource tree, click Administration > User Groups. 2.
3 Key Management Server Connections You can use an optional key management server with P9500 storage systems. This chapter provides information on how to set up the key management server. Key management server requirements If you are using a key management server, it must meet the following requirements: • Protocol: Key Management Interoperability Protocol 1.0 (KMIP1.0) • Software: SafeNet KeySecure k460 6.1.0 • Certificates: ◦ Root certificate of the key management server (X.
Preparing the client certificate workflow Use the following process to prepare the client certificate, which includes setting the client certificate expiration date and password: 1. Download and install openssl.exe from http://www.openssl.org/ to the C:\openssl folder. 2. Create the key file. You can create the following types of key files: • Private key file. For more information about creating a private key file, see “Creating a private SSL key file” (page 13). • Public key file.
4. 5. Complete the following information: • Country Name (two-letter code) • Email Address • (Optional) Challenge password • (Optional) Common name - To obtain a signed and trusted certificate, ensure that the server name is the same as the host name of the storage device.
For more information about the appropriate connection settings, contact the key management server administrator. For more information about the network settings, contact your network administrator. Backing up connection settings to the key management server does not back up the client certificate.
4. In the Setup Key Management Server window, complete the following: • Specify the options to connect to the key management server. • If the key management server is already in use, click Check to test the connection. Otherwise, click Finish. Error messages appear if the server configuration test fails. 5. In the Confirm window, to backup data encryption license keys to the key management server, click Next. Otherwise, complete the following and then click Apply: • Confirm the settings.
4 Managing data encryption license keys This chapter provides information on how to manage data encryption license keys. Managing the keys includes ensuring availability of keys and accessibility to the encrypted or decrypted data. Manage data encryption license keys using the EDKA feature in the P9500 storage system. You must have the Security Administrator (View & Modify) role to manage data encryption license keys.
You must have the Security Administrator (View & Modify) role to back up secondary data encryption license keys. Use the following process to back up the secondary data encryption license key: 1. Confirm that RWC is not processing other tasks. You cannot back up the keys while RWC is processing other tasks. 2. Use one of the following methods to back up a secondary data encryption license key: • Back up the secondary data encryption license key as a file on the RWC computer.
3. 4. 5. In the Encryption Keys table, select the key ID for the data encryption license key you want to back up to a key management server and then complete one of the following: • Click Settings > Security > Encryption Keys > Backup Keys to Server. • Click Backup Keys > To Server. • Click Backup Keys to Server. (Optional) In the Backup Keys to Server window, for Description, type a description and then click Finish.
4. In the Edit Encryption window of the Edit Encryption wizard, complete the following and then click Add: • For Available Groups, select the parity group for which you want to enable data encryption. • For Encryption Key, select the key ID of which to enable data encryption or select Disable to disable data encryption at the parity-group level. • For Format Type, select the format type.
2. 3. On the LDEVs tab, complete one of the following and then click Block LDEVs: • For Parity Group, select the parity group to which the LDEV is associated. • For Logical Device, select the LDEV you want to block. In the confirmation message that appears, click Apply. The LDEV is blocked. Disabling data encryption at the parity-group level Disable data encryption at the parity-group level to perform (normal) formatting options on encrypted data, such as writing to or overwriting an LDEV.
Unblocking LDEVs at the parity-group level Unblock LDEVs at the parity-group level to protect the data after you format an LDEV at the parity-group level. Unblocked LDEVs in the parity group have a status of “Unblocked”. 1. From the RWC main window, click Explorer > Storage System > volume (resource). 2. On the LDEVs tab, complete the following and then click Unblock LDEVs: 3. • For Parity Group, select the parity group to which the LDEV is associated.
1. Block the LDEVs associated to the encrypted parity group. Do one of the following: • Block the LDEV using a file on the RWC computer. For more information about blocking LDEVs using a file, see “Blocking LDEVs using a file” (page 23). • Block the LDEV on the key management server. For more information about blocking LDEVs on the key management server, see “Blocking LDEVs on the key management server” (page 23). 2. Restore an data encryption license key from a primary or secondary backup copy.
6. In the Restore Keys from File window, complete the following item and then click Finish: • For File Name, shows the name of the selected file. View-only: Yes • 7. For Password, type the password for the data encryption license key that you typed when you backed up the selected data encryption license key. In the Confirm window, complete the following and then click Apply: • Confirm the settings. • For Task Name, type the task name.
1. Create a new parity group. For more information about creating parity groups, see _________. 2. Enable encryption with the new data encryption license key. For more information about enabling data encryption at the parity-group level, see “Enabling data encryption at the parity-group level” (page 19). 3. Format the LDEVs in the encrypted parity group. For more information about formatting LDEVs in the encrypted parity groups, see “LDEV encryption formatting at the parity-group level” (page 21). 4.
5. In the Confirm window, complete the following and then click Apply: • Confirm the settings. • For Task Name, type a task name. • (Optional) Select Go to tasks window for status to open the Tasks window. The data encryption license key is deleted from the file on the RWC computer. 6. In the message that appears asking whether to apply the setting to the storage system, click OK.
5 Troubleshooting Common problems using EDKA include connection problems, license problems, and administrator permission problems. Managing or changing encryption settings is not possible if you cannot connect, write to, or run the storage system. Encryption events in the audit log The P9500 storage system audit log records events related to the EDKA feature, including data encryption and EDKA processes.
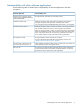
The following table lists common problems and solutions for encryption features. Problem Action Cannot use the EDKA feature to back up or restore a key. Make sure that: • The DKA Encryption software license is valid and installed. • You have the Security Administrator (View & Modify) role. • If you backup and restore data encryption license keys with a key management server, the connection to the key management server is available. Cannot create or delete data encryption license keys.
6 Support and other resources Contacting HP For worldwide technical support information, see the HP support website: http://www.hp.
• http://www.hp.com/support/manuals • http://www.hp.com/support/downloads • http://www.hp.
WARNING! CAUTION: IMPORTANT: NOTE: TIP: Indicates that failure to follow directions could result in bodily harm or death. Indicates that failure to follow directions could result in damage to equipment or data. Provides clarifying information or specific instructions. Provides additional information. Provides helpful hints and shortcuts.
A Conventions This appendix describes phrases in this manual that correspond to phrases in the Remote Web Console windows and messages. Business Copy, Business Copy Z, and Snapshot volumes Business Copy, Business Copy Z, and Snapshot volumes displayed in the Remote Web Console windows and messages differ between Remote Web Console main windows and secondary windows. The differences are shown below.
B DKA Encryption GUI Reference This chapter includes descriptions of encryption-related RWC windows and dialog boxes for the EDKA feature. For more information about other RWC windows and dialog boxes, see the HP XP P9000 Remote Web Console User Guide. Top window when selecting Encryption Keys Use the top window to create data encryption license keys. Clicking Encryption Keys in the Administration tree opens this window. The following figure shows the top window.
Encryption Keys tab Use the Encryption Keys tab to view a list of the data encryption license key details and to select an unused data encryption license key to create. The following table lists descriptions of the items in table on the Encryption Keys tab. Item Description Key ID The IDs of data encryption license keys. Last Update Date The date and time the data encryption license key was created or was last updated. Type The data encryption license key types.
Key Management Server Properties table The following table lists descriptions of the items in the Key Management Server Properties table. Item Description Key Management Server The key management server. Values: • Enable - shows that a key management server is used. • Disable -shows that a key management server is not used. Host Name The host name of the key management server. Port Number The port number of the key management server. Timeout (sec.
Setup Key Management Server window The following figure shows the Setup Key Management Server window. The following table lists descriptions of the items in the Setup Key Management Server window of the Setup Key Management Server wizard. Item Description Key Management Server Select whether to use the key management server: • Enable: (default) key management server is used. • Disable: key management server is not used.
Item Description For more information about the root certificate file, contact the server administrator or the network administrator. Server Configuration Test Click Check to start a server connection test for the key management server based on the specified settings. Check Start a server connection test for the key management server based on the specified settings. Result Shows the result of the server connection test for the key management server.
Item Description Password Shows the password for the client certificate as ****** (six asterisks). Root Certificate File Name Shows the root certificate file for connecting to the key management server. Create Keys wizard Use the Create Keys wizard to create keys and to backup keys to the key management server. This wizard includes the following windows: • Create Keys window • Confirm window Create Keys window Use the Create Keys window to create a data encryption license key.
Selected Keys table on Confirm window The following table lists descriptions of the items in the Selected Keys table on the Confirm window. Item Description Key ID The identifiers for the backup data encryption license keys. Type The data encryption license key types. If the Key ID is 0 to 31, the label Internal is displayed. Edit Password Policy wizard Use the Edit Password Policy wizard to edit the password policy for backup keys.
The following table lists descriptions of the items on the Edit Password Policy window. Item Description Numeric Characters (0-9) The minimum number of numeric characters that should be used for this password. Values: 0 to 255 Default: 0 Uppercase Characters (A-Z) The minimum number of alphabetical upper case characters that should be used for this password.
The following table lists descriptions of the items on the Confirm window. Item Description Numeric Characters (0-9) Displays the minimum number of numeric characters that should be used for this password. Uppercase Characters (A-Z) Displays the minimum number of alphabetical upper case characters that should be used for this password. Lowercase Characters (a-z) Displays the minimum number of alphabetical lower case characters that should be used for this password.
The following table lists descriptions of the items on the Backup Keys to File window. Item Description Password The password for the backup data encryption license key. Character limits: 6 to 255 Valid characters: • Numbers (0 to 9) • Upper case (A-Z) • Lower case (a-z) • Symbols: ! " # $ % & ' ( ) * + , - . / : ; < = > ? @ [ \ ] ^ _ ` { | } ~ Re-enter Password The type the password again for confirmation. Finish Click to save the password for the backup data encryption license key.
Backup Keys to Server wizard Use the Backup Keys to Server wizard to backup data encryption license keys on the key management server. This wizard includes the following windows: • Backup Keys to Server window • Confirm window Backup Keys to Server window The following figure shows the Backup Keys to Server window. The following table lists descriptions of the items on the Backup Keys to Server window.
Confirm window The following figure shows the Confirm window. The following table lists descriptions for the item in the Backup Keys table. Item Description Description Shows the description for the backup data encryption license key. Restore Keys from file wizard Use the Restore Keys wizard to restore data encryption license keys from a file you backed up on the RWC computer.
The following table lists descriptions of the items on the Restore Keys from File window. Item Description File Name The file name of the selected backup file. Browse Select the backup file (.ekf). The name of the selected file is shown for File Name. Password The password that you typed when you created the backup data encryption license key. Confirm window The following figure shows the Confirm window.
The following table lists descriptions of the items on the Confirm window. Item Description Item The item of the data encryption license key to restore. Value The value of the data encryption license key to restore. Restore Keys from Server wizard Use the Restore Keys from Server wizard to restore data encryption license keys from the key management server.
The following table lists descriptions of the items in the Selected Backup Keys table in the Confirm window. Item Description UUID Shows the UUID of the data encryption license key you backed up on the key management server. Backup Date Shows the time when you backed up the data encryption license key on the key management server. Description Shows the description you typed when you backed up the data encryption license key on the key management server.
The following table lists descriptions of the items in the Selected Keys table in the Delete Keys window. Item Description Key ID The IDs of data encryption license keys. Type The data encryption license key types. If the key ID is 0 to 31, the label Internal is displayed. Confirm window The following figure shows the Confirm window of the Delete Keys wizard. The following table lists descriptions of the items in the Selected Keys table in the Confirm window.
The following table lists the descriptions of the items in the Selected Backup Keys table. Item Description UUID Shows the UUID of the data encryption license key you backed up on the key management server. Backup Date Shows the time when you backed up the data encryption license key on the key management server. Description Shows the description you typed when you backed up the data encryption license key on the key management server.
Backup Keys table The Backup Keys table is shown on the View Backup Keys on Server window. This table lists the backup data encryption license keys. The following table lists descriptions of the items in the Backup Keys table. Item Description UUID Shows the UUID of the backup data encryption license key on the key management server. Backup Date Shows the time you backed up the data encryption license key on the key management server.
Edit Encryption window The Edit Encryption window includes the following items: • Available Parity Groups table For more information about this table, see “Available Parity Groups table” (page 51). • Selected Parity Groups table For more information about this table, see “Selected Parity Groups table” (page 52). • Encryption Key drop-down list, from which you can select the key ID of which to enable data encryption or to disable data encryption at the parity-group level.
The following table lists descriptions of the items in the Available Parity Groups table. Item Description Parity Group ID Shows the parity group IDs. RAID Level Shows the RAID level of the parity group. For an interleaved parity group, the interleaved number appears after the RAID level. Example: 1(2D+2D)*2 Capacity Shows the total capacity (unit) of the parity group. Drive Type/RPM Shows the hard disk drive types and RPM (rotation per minute) of the LDEV in the parity group.
The following table lists descriptions for the items in the _________ table. Item Description Parity Group ID Shows parity group IDs. RAID Level Shows the RAID level of the parity group. For an interleaved parity group, the interleaved number appears after the RAID level. Example: 1(2D+2D)*2 Capacity Shows the total capacity (unit) of the parity group. Drive Type/RPM Shows the hard disk drive types and RPM (rotation per minute) of the LDEV in the parity group.
Selected Parity Groups table Use the Selected Parity Groups table to view a list of the selected parity groups related to the data encryption license key. The following table lists descriptions of the items in the Selected Parity Groups table. Item Description Parity Group ID Shows parity group identifier. RAID Level Shows the RAID level of the parity group. For an interleaved parity group, the interleaved number appears after the RAID level.
Glossary bit The basic unit of data in a binary numbering system (binary digit), represented by a 0 or a 1. Eight bits equals one byte. DKA Disk adapter. LUN Logical unit number. A LUN results from mapping a logical unit number, port ID, and LDEV ID to a RAID group. The size of the LUN is determined by the emulation mode of the LDEV and the number of LDEVs associated with the LUN. LUSE Logical Unit Size Expansion.
Index blocking volumes, 20, 23 requirements, 10 host platforms, 10 license key, 10 microcode, 10 password for encryption key, 42 Remote Web Console, 10 volume types, 10 C S contacting HP, 29 conventions document, 30 storage capacity values, 30 text symbols, 31 storage capacity values conventions, 30 Subscriber's Choice, HP, 29 symbols in text, 31 D technical support HP, 29 service locator website, 29 text symbols, 31 troubleshooting, 27 typographic conventions, 30 A AES-256, 6 audit logging, 8, 27