
HP StorageWorks Core Switch 2/64 Getting Started & General Reference Guide


28 getting started and general reference guide
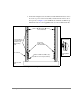
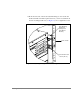
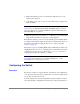
14.From the rear side of the rack, install screws into the second and bottom
positions on the right front mounting bracket through the Tinnerman nuts
installed earlier (see Figure 18). For an HP Rosebowl II rack, use M5
Torx head screws with captive lock washers. For a Compaq/Rittal rack,
use #10-32 x .63” Phillips pan-head screws with integrated lock washers.
Do not tighten the screws.
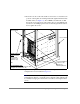
Figure 18. Securing the Switch to the Right Front Mounting Bracket
15.Tighten the screws installed in Steps 13-14.
Note If you find that you cannot tighten all the screws, you may be having
an alignment problem. Loosen all the screws, align the switch with the rack
by carefully leveraging the switch with a screwdriver, and retighten all the
screws.
HP Rosebowl II
Rear of Rack
Front of Rack
Rack:
M5 Torx Head
Screws with
Captive Lock
Washers (2x)
Or
Compaq/Rittal Rack:
#10-32 Phillips Pan-Head Screws with
Integrated Lock Washers (2x)
Second and Bottom
Positions of the
Right Front
Mounting Bracket