
HP StorageWorks XP24000 Continuous Access Software User and Reference Guide, v01 (T5278-96002, June 2007)

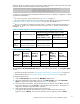
Controller ID: Allows you to select the controller ID (stora ge system family ID) of the RCU being added
from the drop-down list. The controller ID for an HP XP24000 Disk Array is 5 and the controller ID
for an HP XP12000 Disk Array is 4.
Logical Adr. (RCU CU): Allows you to enter the CU number of the RCU being added. The CU number
differs by the specified controller ID as follows:
• When the specified controller ID is 5 (HP XP24000 Disk Array) , you can select a CU number
from 00 to FE.
• When the specified controller ID is 4 (HP XP12000 Disk Array) , you can select a CU number
from 00 to 3F.
SSID: allows you to enter the SSID(s) of the RCU being added. The storage system uses one SSID for
each set of 256 volumes a nd one SSID for each set of 64 volumes or four SSIDs per CU. The SSID is
4-FFFF (hexadecimal) .
Path Gr. ID: Allows you to enter the path group ID for using CU Free. To enter the path group ID,
clear the Default check box, a nd input the value in hexadecimal within the range of 1 to FF. To use the
default ID, click the Default check box.
MCU-RCU Path: Displays different boxes depending on the channel interface type (fibre).
• MCU Port: Allows youto selectthe MCUportnumberfrom the drop-downlistortoenter the
port number directly. Initiator ports are listed.
• RCU Port: Allows you to select the RCU port number from the drop-down list or to enter the port
number directly. You must select RCU target ports.
Note:
Yo u can specify the por t number with two characters. For instance, you can abbreviate CL1-A as
1A. You can also enter the port number in both lowercase and uppercase characters.
The Option button opens the RCU Option dialog box (see “Changing the RCU Options” on page 75).
The Cancel button cancels the settings you m ade on the Add RCU d ialog box, and closes the dialog box.
To add an RCU to the connected MCU:
1. Make sure the remote copy connections and ports are properly configured. Get the S/N and
SSID(s) for the desired CU of the RCU. The add RCU operation will fail without this information.
The storage system should have a label or tag indicating its S/N and SSIDs, or ask your HP
service representative for the RCU S/N and SSIDs.
2. Click the RCU Op eration tab, click the MCU&RCU display button, and select the desired CU in
the
tree. You must add RCUs to each CU separately.
3. Right-click the list (an RCU does not have to be selected), click RCU Operation, and then click
Add
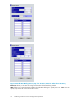
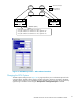
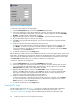
RCU to open the Add RCU d ialog box (see Figure 26 on page 72).
4. On the Add RCU dialog box, enter the S/N, controller ID (5 for an HP XP24000 Disk Array
or 4
for an HP XP12000 Disk Array) , CU number, and SSID(s) or Path Gr. ID for the desired
RCU CU. Enter the value in hexadecimal within the range of 1 to FF for Path Gr . ID or use
the
default value. Up to 64 Path Gr. IDs can be registered per storage system. The MCU
verifies the S/N when the paths are established, a nd verifies the SSIDs when the pairs are
created. If desired, you can add and delete SSIDs later using the Add SSID dialog box (see
“Adding and Deleting SSIDs for an RCU” on page 79).
5. Select the MCU port and RCU port. The MCU will not allow you to establish less
than the
minimum number of paths as specified o n the RCU Option dialog box. If
desired, you can add and delete paths later using the Add Path dialog box (see
“Adding and Deleting Logical Paths to an RCU” on page 78).
6. Click the Option button to open the RCU Option d ialog box (see
“Changing the RCU Options” on page 75), and enter the desired settings.
Note:
When you have Continuous Access Asynchronous pairs configure d on a Fibre Channel
interface, set the same value for the Mi nimum Paths option for all RCUs.
7. Click Set to close the RCU Option dialog box, e v en if you made no changes. (Click Cancel to
cancel the add RCU operations.) The preview list d isplays the requested add RCU operation(s) .
8. Verify the requested operation(s) displayed in the preview list. To change one o r more
operations, select the operation(s), right-click the p review list, and click Modify.To remove
XP24000ContinuousAccessSoftwareUserand ReferenceGuide
73