
Hitachi TrueCopy for IBM z/OS User and Reference Guide (T5211-96001, June 2007)

Performing TrueCopy for z/OS Configuration Operations 5-57
Hitachi Universal Storage Platform V TrueCopy for IBM z/OS User’s Guide
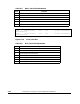
• SCP Time: State-change-pending (SCP) time. SCP Time of TrueCopy for
z/OS and the state-change-pending time of Compatible FlashCopy V2 are
same. If you change the state-change-pending time of TrueCopy for z/OS,
the state-change-pending time of Compatible FlashCopy V2 will change
simultaneously. If you also change the state-change-pending time of
Compatible FlashCopy V2, the state-change-pending time of TrueCopy for
z/OS will change. For more information on state-change-pending time of
Compatible FlashCopy V2, please refer to the Compatible Mirroring for IBM
FlashCopy User’s Guide.
• Activities: Number of volumes in concurrent initial copy operations (1 to
16).When you set Disable for Maximum Initial Copy Activities (CU)
option on the System Option dialog box, Disable is shown instead of
number.
To change the option settings of the CU:
Note: In order to specify the Maximum Initial Copy Activities on the CU
Option dialog box, you need to set the Maximum Initial Copy Activities
(CU) to Enable on the System Option dialog box in advance.
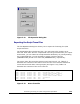
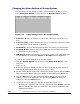
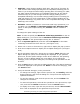
1. Click the System Option tab, and then select CU Option for the LDKC
containing the desired CU from the tree. (see Figure 4-13).
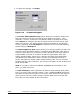
2. Select one or more CU from the list, right-click to display the pop-up menu.
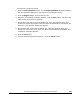
3. Click the CU Option button to display the CU Option dialog box (see Figure
5-19).
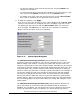
4. On the CU Option dialog box, change the CU options. Note: When the CU
Option dialog box opens, current settings are displayed. If you specified
plural CUs, and the option settings of each CU are different, the inputting
box(es) on the CU Option dialog box is/are blank. If you change the
setting(s) on the CU Option dialog box, the settings of all specified CUs will
be same.
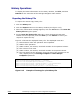
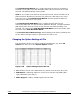
5. Click the Set button to close the CU Option dialog box. The desired change(s)
is/are now displayed in the preview list. Note: To cancel the change(s), click
the Cancel button.
6. Verify the desired change(s) in the preview list.
– To change the settings, right-click the preview list, click Modify, make the
desired changes, and close the dialog box. The preview list displays the
updated information.
– To omit the settings, right-click the preview list, and click Delete. The
changes are cancelled.
– To cancel all operations, select all the operations in the preview list, right-
click, and click the Delete command or click the Cancel button.
– To display error code, right-click the preview list, and click Error Detail.
Error code is displayed on the rightmost the preview list.