
HP StorageWorks Continuous Access EVA Administrator Guide (T3687-96043, December 2005)
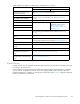
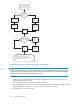
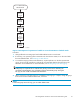
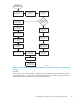
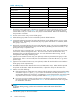

Table 4 Array log
Array with failed or new hardware
Current source array
Array Name
Array Name
Array Name
Array Name
Array Name
Array Name
Array Name
Array Name
1. Record the names of the array with failed or new hardware (current destination) and the current
source array in a table such as Table 4. For example, your array with new hardware may be
named HSV 01 and your current source array m ay be named HSV02. Refer to this table during
the pro cedure as needed.
2. On the current source array , resume all DR groups.
3. Delete all DR groups that ever had a relationship with the failed ha rdwa re.
4. Contact HP-authorized personnel to replace the hardware on the failed (previous source, current
destination) array. Depending on the failure, they may replace hard drives or controllers, delete
disk groups, a nd so on.
5. Remove the connection between the source and destination a rrays. This ca n be accomplishe d by
removing the repaired (destination) array from the SAN, by disabling the interswitch links, or by
placing the arrays in separate zones.
To place the a rray in separate zones, you need t wo zones. One zone contains the source a rray,
source hosts, and the management server. The second zone contains the destination array,
destination hosts, and the management server. For more information about zoning, see HP
Storag eWorks SAN design reference guide.
6. (Optional. Not needed if entire array was replaced.) Delete any destination DR g roups on the
repaired array. If this is not successful, the source-destination connection still exists, so go to the
previous step.
7. (Optional. Not ne ede d if entire array was replaced.) Delete all virtual disks that were members
of DR groups on the repaired array.
8. Re-establish communication between the source and destination arrays. Either add the repaired
array back into the SAN, enable the interswitch links, or place the arrays into the same zone.
9. Perform one of the following:
a. If the replaced array configuration was c aptured with the Storage System Scripting Utility (SSSU),
execute the script ConfigName_step1A on the new hardwa re, and then proceed to Step 14.
See the SSSU reference for instructions. ConfigName is a user-assigned name given to the SSSU
script at the time of creation. See the procedure titled Backing up replication configuration.
b. If you are not using a n SSSU script for recovery, initialize the repaire d or replaced array
using the information y ou recorded in the Table 4.SeeHP Command View EVA user guide
for initialization instructions.
NOTE:
To preserve existing zoning, give the new hardware the World Wide Names of the failed
hardware.
10. Add the disk groups on the new hardware.
40
Failover and recovery