
HP StorageWorks Command View SDM Installation and User Guide (T1086-96023, February 2005)


Installing Command View SDM 61
Installing
Command View SDM
The Installation Process
The following steps identify the main tasks performed during the installation of
the software.
1 The installer creates the directory structure on the host and copies the
Command View SDM files to the appropriate folders.
2 The OpenDIAL and HostAgent services start, which in turn launch the
server components - SCSI Gateway, Logging Service, etc.
3 The armdiscover process is initiated, which causes OpenDIAL to do a
discovery of all arrays connected to the host.
4 The results of the discovery are stored in the device database files used by
other components. The contents of the database files are used to populate
the Launcher, and are returned in response to an armdsp -i command.
5 When all arrays are discovered, the logging service is enabled and it
begins collecting log entries for the discovered arrays.
6 When the Launcher is run, it retrieves device information from the device
data to determine what arrays are connected. The Launcher then accesses
each array to determine its status and displays the appropriate icon for
each array.
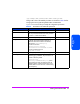
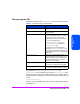
File Directory Structure
During the installation a directory structure is created on the host for the
Command View SDM files. The main directory structure is listed below.
HP-UX and Linux Directories
The following directories are created when installing Command View SDM on
an HP-UX or Linux host. Files are split between /opt/sanmgr, /etc/opt/
sanmgr, and /var/opt/sanmgr
/opt/sanmgr
/opt/sanmgr/jre/bin
/opt/sanmgr/jre/lib
/opt/sanmgr/hostagent/sbin
/opt/sanmgr/hostagent/config > /etc/opt/sanmgr/hostagent/
config
/opt/sanmgr/hostagent/data > /var/opt/sanmgr/hostagent/
data
/opt/sanmgr/hostagent/log > /var/opt/sanmgr/hostagent/log