
HP EVA-to-3PAR Online Import Migration Guide

For example, On node1, change the mode back to shared vgchange -a s -x
vg_shared and on the other cluster nodes, activate vg_shared in shared mode
vgchange -a s vg_shared.
h. Applications using the shared volume group can now be restarted on other hosts. For
more information, see
http://h20000.www2.hp.com/bc/docs/support/SupportManual/c01914684/
c01914684.pdf
15. If you are migrating cluster lock disks, update the cluster lock disk configuration using the
following procedure:
a. Note down the new pv_paths to the lock disks from the output of the LUN rescan .
b. Run vgcfgrestore -n /dev/vg_lock pv_path.
c. In the cluster configuration file, modify the values of FIRST_CLUSTER_LOCK_PV for
each node.
d. Run cmcheckconf to check the configuration.
e. Run cmapplyconf to apply the configuration.
For more information, see http://h20000.www2.hp.com/bc/docs/support/
SupportManual/c02057890/c02057890.pdf
16. Unzone the source EVA from the host.
NOTE: If you are booting from a disk that is being migrated, ensure to check or update the
setboot path definitions.
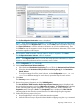
17. When the host has been unzoned, click Completed.
The Data Transfer status displays the Start button.
18. Click Start to begin the migration. A confirmation screen identifies conditions that must be met
before beginning the migration.
IMPORTANT: Once a migration begins, it cannot be stopped.
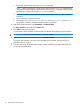
19. When all the conditions have been met, click Start Data Transfer.
The progress bar indicates the data transfer and is refreshed every 15 seconds.
20. When the migration is complete, the migration entry is deleted, and the Migration History is
updated with the details of the migration.
Migrating unpresented virtual disks
Offline migration is used when migrating unpresented virtual disks.
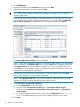
1. In Command View, select the Storage Systems point of view.
2. Select the HP EVA to 3PAR StoreServ Online Import tab.
3. In the left navigation pane, select a virtual disk.
You can select a virtual disk folder or an individual virtual disk.
4. Click Add Migration.
The Add Migration from a Virtual Disk Selection wizard is displayed.
5. Read the information on the Introduction screen, then click Next.
The Select explicit migration source screen is displayed.
6. Select one or more unpresented virtual disks as the source virtual disks.
7. Click Next.
The Confirm Explicit and Implicit Migration Sources screen is displayed.
28 Performing the data migration