
HP EVA-to-3PAR Online Import Migration Guide
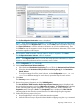

4. Click Add Migration.
5. Read the information on the Introduction screen, then click Next.
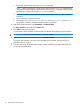
6. Select the host that will be the source, then click Next.
TIP: If the number of objects included in the migration is too large, you can cancel the
migration at this point.
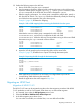
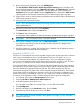
7. Check the explicit and implicit host and virtual disk selections to ensure that they are ready
for migration. When using HP P6000 Command View 10.2.1 or later, select the Migration
Type as Online migration for a standalone or cluster operating system. Click Next.
The Confirm Migration Destination screen is displayed.
NOTE: If any object selected for migration is not ready for data migration, the appropriate
status is displayed in the Migration OK? column, and the Next button is disabled. In this case,
click Export Selections to save the selections information to a file for troubleshooting. Then
click Cancel to stop the migration wizard. Using the saved selections information, correct the
problem and run the migration wizard again.
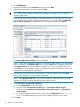
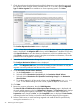
8. Ensure that the 3PAR Destination Storage System is ready for migration, then click Next.
The Configure Destination Volumes screen is displayed.
NOTE: If the Migration OK? status is not OK, the tooltip provides information on why the
migration cannot be performed until the necessary action is taken.
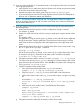
9. Set the Destination Virtual Volume Attributes.
a. Set the Configuration to Set individually.
b. Select the desired Destination Provisioning for the Destination Virtual Volume.
c. Select the desired Destination CPG (Common Provisioning Group) for the Destination
Virtual Volume.
d. To use these settings for all the virtual volumes, set the Configuration to Set all the
same. To use different settings for each volume, repeat the steps for each volume.
10. Click Next.
24 Performing the data migration