
4.0.0 HP PolyServe Software for Microsoft SQL Server Administration Guide (T5392-96056, March 2010)


Plan Your SQL configuration
Before installing SQL Server, it is important to determine how the SQL Server instances should be
configured across the matrix. First determine the number of SQL instances that you will need. These
instances can be installed on any node in the matrix.
Next, determine how you want to associate the instances with Virtual SQL Servers. You could use a
separate Virtual SQL Server for each instance, you could assign all of the instances on a node to a
single virtual server, or you could use some other scheme.
Then determine how you want to configure the Virtual SQL Servers. Each Virtual SQL Server needs a
primary node and one or more backup nodes. The backup nodes for each Virtual SQL Server must
contain the same set of SQL instances as the primary node. Following are some sample configurations.
NOTE:
A primary SQL instance and its backup SQL instances must have the same name. For example, if you
install an SQL instance called “instance1” on the primary node, you will also need to install an instance
called “instance1” on the backup node.
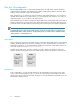
Active-Active
In this configuration, the nodes in the matrix back up each others’ Virtual SQL Servers. In the following
example, the Virtual SQL Server “virtual1” is primary on node1 and has a backup on node2. The
SQL instance “instance1” is associated with this virtual server and exists on both nodes. Clients can
access the virtual server using virtual1\instance1.
Similarly, Virtual SQL Server “virtual2” is primary on node 2 and has a backup on node1. Two
instances (instance2 and instance3) are associated with this virtual server and exist on both nodes.
Many-to-One
In this configuration, one node provides backups for the Virtual SQL Servers running on the other
nodes. In the following example, nodes 1, 2, and 3 are each hosting a Virtual SQL Server. These
virtual servers all use node 4 as a backup. The instances associated with the Virtual SQL Servers are
all installed on backup node 4.
Introduction10