
3.6.0 MxDB for SQL Server Installation and Administration Guide (5697-7088, December 2007)

Chapter 3: Install SQL Server Instances 13
Copyright © 1999-2007 PolyServe, Inc. All rights reserved.
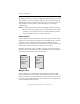
• Mount the filesystem as a mountpoint such as c:\psfs\psd15p1. In
Windows Explorer, open the Properties for the folder, go to the
“Mounted Volume” properties (this is not the same as the folder
security), and set the permission for Administrators/users to Full
Control.
•Use the cacls.exe utility to give the local Administrators group full
control and to give Everyone read-only permissions. In the following
command, %1 is the mounted folder.
cacls %1 /t /m /p Administrators:F Everyone:R
For example:
cacls c:\psfs\psd1p1 /t /m /p Administrators:F Everyone:R
NOTE: If you are installing a retail version of SQL Server 2005, be sure to
enter the product key provided with your software. The product
key is required for all retail versions of SQL Server 2005. If you do
not specify a product key, the installer will add a sample product
key (“PID=123456789ABCD”) to the template.ini file. However,
MSDN versions of SQL Server 2005 already have the product keys
embedded in the installation files.
Installation Considerations for SQL Server 2000
When installing SQL Server 2000 instances, you should be aware of the
following:
• The Multi-Node Installer uses an ISS template file to invoke the SQL
Server installation. This file should be saved in a location that
provides read access for all nodes. The installer also places a
node-specific copy of the template in the Windows directory under
the system root on each node involved in the installation. These copies
can be deleted after the installation is complete.
Computer Names for Nodes Used for SQL Server
Do not change the computer names of the nodes that will be used for SQL
Server installations. If the computer name is changed, SQL instances may
fail to start during virtualization or failover or after an MxDB for SQL
Server upgrade.