Matrix File Serving Solution Pack for CIFS Administration Guide Matrix File Serving Solution Pack for CIFS 3.
Copyright © 2004-2006 PolyServe, Inc. Use, reproduction and distribution of this document and the software it describes are subject to the terms of the software license agreement distributed with the product (“License Agreement”). Any use, reproduction, or distribution of this document or the described software not explicitly permitted pursuant to the License Agreement is strictly prohibited unless prior written permission from PolyServe has been received.
Contents 1 Introduction Virtual CIFS Servers. . . . . . . . . . . . . . . . . . . . . . . . . . . . . . . . . . . . . . . . . Matrix File Shares. . . . . . . . . . . . . . . . . . . . . . . . . . . . . . . . . . . . . . . . . . . CIFS and Legacy Client Operating Systems. . . . . . . . . . . . . . . . . . . . . Windows Clients . . . . . . . . . . . . . . . . . . . . . . . . . . . . . . . . . . . . . . . . Linux Clients . . . . . . . . . . . . . . . . . . . . . . . . . . . . . . . . . . . . . . . . . . . .
Contents iv Scripts . . . . . . . . . . . . . . . . . . . . . . . . . . . . . . . . . . . . . . . . . . . . . . . . . Linux Clients . . . . . . . . . . . . . . . . . . . . . . . . . . . . . . . . . . . . . . . . . . . . . . Other Procedures . . . . . . . . . . . . . . . . . . . . . . . . . . . . . . . . . . . . . . . . . . Virtual CIFS Servers . . . . . . . . . . . . . . . . . . . . . . . . . . . . . . . . . . . . . Virtual File Shares . . . . . . . . . . . . . . . . . . . . . . . . . . . . . . . . . . .
1 Introduction The MxFS for CIFS (CIFS) Solution Pack and PolyServe Matrix Server provide scalability and high availability for the Common Internet FileSystem (CIFS). CIFS is a variation of the Server Message Block (SMB) protocol. It runs over TCP/IP and is commonly used on Windows systems to share files remotely. CIFS file shares can be deployed in two ways: with Virtual CIFS Servers that provide failover support, or with Matrix File Shares that enable connection load balancing.
Chapter 1: Introduction 2 where it will continue to provide access to the same PSFS filesystem data under the same name/IP-address pair. This deployment method works well with clients running modern Windows operating systems such as Windows XP and Windows 2000. To take advantage of the transparent failover feature, clients must connect to the Virtual CIFS Server using either the Fully Qualified Domain Name (FQDN) or the IP address.
Chapter 1: Introduction 3 CIFS and Legacy Client Operating Systems Several legacy client operating systems do not support the modern networking infrastructure required to connect to a virtualized network connection such as that provided by the Virtual CIFS Server. These operating systems include Windows NT4, Windows ME, Windows 98, Windows 95, Windows 3.1, DOS, MAC SMB client, and some Linux versions.
Chapter 1: Introduction 4 Linux Clients A software update for Linux is available at the following location: http://us1.samba.org/samba/Linux_CIFS_client.html A Linux client implemented in Java is available at this location: http://jcifs.samba.org/ In addition to interoperating with DFS, Linux clients can also connect directly to Virtual File Shares. (See “Linux Clients” on page 33 for more information.
Chapter 1: Introduction Security To provide security protection across the matrix, we recommend that all nodes in the matrix participate in the same domain. Copyright © 1999-2006 PolyServe, Inc. All rights reserved.
2 Configure CIFS with Matrix File Shares Configuration Overview Matrix File Shares are Windows CIFS shares associated with a CIFS filesystem health monitor. Clients connect to Matrix File Shares using the network name or IP address of any physical server in the cluster. Each node in the cluster provides access to the same PSFS filesystems through its Matrix File Shares.
Chapter 2: Configure CIFS with Matrix File Shares 7 There are two steps to the configuration process: first create Matrix File Shares and then configure DFS (or another load balancer). NOTE: Before creating Matrix File Shares, you will need to create PSFS cluster filesystems to store the files that will be shared via CIFS. For each filesystem, you will need to assign a drive letter or path that will be used to access the filesystem.
Chapter 2: Configure CIFS with Matrix File Shares 8 Application: An “application” provides a tag to group Matrix File Shares and related resources on the Applications tab. All of the resources associated with the application can then be treated as a unit. You can specify a new application name, select an existing application name, or leave this field blank. However, if you do not assign a name, Matrix Server will use the name of the Virtual File Share as the application name.
Chapter 2: Configure CIFS with Matrix File Shares 9 any of the same nodes, the Matrix File Share and the Virtual File Share must be configured identically. If a Matrix File Share and a Virtual File Share have the same name but are configured differently (for example, they point to different paths), share name collisions can occur in failover situations. This can cause CIFS clients to connect to the wrong file share and can cause alerts to appear on the PolyServe Management Console.
Chapter 2: Configure CIFS with Matrix File Shares 10 When you click OK, the Matrix File Share appears on the Servers and Applications tabs on the PolyServe Management Console. NOTE: If a Matrix File Share is configured to allow sharing its subdirectories, an asterisk (*) appears at the end of the path for the Matrix File Share (for example, C:\test8\*).
Chapter 2: Configure CIFS with Matrix File Shares 11 The Applications tab lists the Matrix File Shares under their associated applications. Following is the Applications view of the configuration shown above. To add a Matrix File Share from the command line, use this command: mx mfs add [arguments] --path --servers ALL_SERVERS| ,,... See the Matrix Server Command Reference for more information about this command. Copyright © 1999-2006 PolyServe, Inc.
Chapter 2: Configure CIFS with Matrix File Shares 12 Configure DFS The Microsoft Distributed File System (DFS) can be used in conjunction with CIFS to provide high availability failover and load balancing across the nodes in the matrix. NOTE: If you are using Windows 2003, the DFS namespace must be administered from with the Windows 2003 version of the administrative tools. Do not use the administrative tools provided with Windows 2000 to manage DFS.
Chapter 2: Configure CIFS with Matrix File Shares 13 • Shares deployed via DFS must be under the control of CIFS. Use only Matrix File Shares; they are designed to work properly with DFS and CIFS. The following should not be used: – CIFS shares created with other Windows applications. These shares will not be under CIFS control. – Virtual CIFS Servers. These virtual servers are not compatible with DFS. • Matrix File Shares must be created before you set up DFS. (See “Add a Matrix File Share” on page 7.
Chapter 2: Configure CIFS with Matrix File Shares 14 Other Procedures Matrix File Shares Modify the Configuration of a Matrix File Share To change the configuration of a Matrix File Share, select it on the Servers or Applications tab, right-click, and select Properties. You can then modify the configuration as necessary. You can also enter the following at the Command Prompt: mx mfs update [arguments] [--path ] [--servers ALL_SERVERS|,,...
Chapter 2: Configure CIFS with Matrix File Shares 15 Matrix File Share Monitors Disable or Enable a Matrix File Share Monitor To disable a Matrix File Share monitor on a particular node, select it on the Servers tab, right-click, and select Disable. (On the Applications tab, right-click in the server cell corresponding to the Matrix File Share.) To reenable the monitor, select it on the PolyServe Management Console, right-click, and select Enable.
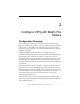
3 Configure CIFS with Virtual CIFS Servers Configuration Overview When CIFS is configured with Matrix Server, the data to be shared is stored on PSFS clustered filesystems. A set of Virtual File Shares, one per node in the matrix, is typically created for each filesystem. “Virtual CIFS Servers” are then used to provide CIFS access to the Virtual File Shares.
Chapter 3: Configure CIFS with Virtual CIFS Servers 17 CIFS clients use a Virtual CIFS Server to access file share data1 Ethernet VFS1 Primary VFS1 Backup1 VFS1 Backup2 file share file share file share data1 data1 data1 Matrix Server FC Fabric \data1 filesystem Disk Array If CIFS detects that a Virtual File Share can no longer be accessed on the primary node, by default Matrix Server will fail over the associated Virtual CIFS Server to one of the designated backup nodes.
Chapter 3: Configure CIFS with Virtual CIFS Servers 18 Virtual CIFS Servers Providing Multiple Virtual File Shares Multiple Virtual File Shares can be associated with a Virtual CIFS Server, and multiple Virtual CIFS Servers can be supported on a physical node. Also, a node can host multiple active Virtual CIFS Servers while simultaneously serving as a backup for Virtual CIFS Servers that are active on other nodes.
Chapter 3: Configure CIFS with Virtual CIFS Servers 19 VFS1, VFS2, and VFS3. The Virtual File Share is configured identically on each Virtual CIFS Server. Node 1 is primary for Virtual CIFS Server VFS1, node 2 is primary for VFS2, and node 3 is primary for VFS3. Each node is a backup for the other Virtual CIFS Servers. CIFS clients connect to the load balancer (such as round-robin DNS or a hardware load balancer) and the clients are then routed to one of the nodes.
Chapter 3: Configure CIFS with Virtual CIFS Servers 20 Configuration Steps Perform the configuration in this order: • Create PSFS cluster filesystems to store the files that will be shared via CIFS. For each filesystem, you will need to assign a drive letter or path that will be used to access the filesystem. See the PolyServe Matrix Server Administration Guide for details about creating and configuring filesystems. • Create a Virtual CIFS Server, specifying a primary node.
Chapter 3: Configure CIFS with Virtual CIFS Servers 21 Create a Virtual CIFS Server To create a Virtual CIFS Server, from the PolyServe Management Console select Matrix > Add >Add Virtual CIFS Server. The Add Virtual CIFS Server window then appears. Address: Specify either the IP address or the DNS name that will be associated with this Virtual CIFS Server. The DNS name must already be configured in the DNS service. DNS/NetBIOS name: Use this field to specify a DNS/NetBIOS name.
Chapter 3: Configure CIFS with Virtual CIFS Servers 22 You can specify a new application name, select an existing application name, or leave this field blank. However, if you do not assign a name, Matrix Server will use the IP address of the Virtual CIFS Server as the application name. Policy: The policy determines the failback action that the Virtual CIFS Server will take following a failover to a backup node. • AUTOFAILBACK.
Chapter 3: Configure CIFS with Virtual CIFS Servers 23 To add a Virtual CIFS Server from the command-line, use this command: mx vfs add [--policy autofailback|nofailback] [ALL_SERVERS | ] See the PolyServe Matrix Server Command Reference for more information about using this command. Add a Virtual File Share When you add a Virtual File Share to a Virtual CIFS Server, be sure to use the PolyServe Management Console instead of a Windows application.
Chapter 3: Configure CIFS with Virtual CIFS Servers 24 Virtual CIFS Server: This field contains the IP address of the Virtual CIFS Server that you selected. Share Name: Type a name for the Virtual File Share. NOTE: You can use the same share name for Virtual File Shares assigned to different Virtual CIFS Servers. However, if the Virtual CIFS Servers are configured on any of the same nodes, the Virtual File Shares must be configured identically.
Chapter 3: Configure CIFS with Virtual CIFS Servers 25 This situation also applies to Matrix File Shares. If a Virtual File Share and a Matrix File Share have the same name and are using any of the same nodes, they must be configured identically. Path: Type the location of the Virtual File Share (such as y:\). This is typically the drive letter or path assigned to the PSFS filesystem that will be accessed via this share.
Chapter 3: Configure CIFS with Virtual CIFS Servers 26 NOTE: If a Virtual File Share is configured to allow sharing of subdirectories, an asterisk (*) appears at the end of the path for the Virtual File Share (for example, C:\test8\*). The shared subdirectories are not displayed on the Servers or Applications tabs; however, alerts will be displayed if the Virtual File Share monitor detects a problem with a shared subdirectory.
Chapter 3: Configure CIFS with Virtual CIFS Servers 27 To add a Virtual File Share from the command line, use this command: mx vfs_share add [arguments] --path \\\ See the PolyServe Matrix Server Command Reference for more information about using this command. Virtual File Share Advanced Configuration You can customize the operation of the Virtual File Share monitor by using the Advanced options provided on the Add Virtual File Share window.
Chapter 3: Configure CIFS with Virtual CIFS Servers 28 Policy The Policy tab lets you specify the failover policy and service priority that will apply to the Virtual File Share monitor. Timeout and Failure Severity: This setting works with the Virtual CIFS Server policy (either AUTOFAILBACK or NOFAILBACK) to determine what happens when the monitor’s probe fails.
Chapter 3: Configure CIFS with Virtual CIFS Servers 29 record of its health. To use this option, you must also specify IGNORE as the Event Severity on the Scripts tab. AUTORECOVER. When the monitor probe fails, the ClusterPulse process automatically fails over the associated Virtual CIFS Server to a backup node. Failback occurs in accordance with the policy setting for the Virtual CIFS Server (either AUTOFAILBACK or NOFAILBACK).
Chapter 3: Configure CIFS with Virtual CIFS Servers 30 Script Pathnames: The Virtual File Share monitor can optionally be configured with the following types of scripts: Recovery script. Runs after a monitor probe failure is detected, in an attempt to restore access to the Virtual File Share. Start script. Runs as the Virtual File Share is becoming active on a server. Stop script. Runs as the Virtual File Share is becoming inactive on a server.
Chapter 3: Configure CIFS with Virtual CIFS Servers 31 This behavior is necessary because the Start and Stop scripts are run to establish the desired start/stop activity, even though the service may actually have been started by something other than CIFS. The Start and Stop scripts must also handle recovery from events that may cause them to run unsuccessfully. For example, if the system encounters a problem, the script will fail and exit non-zero.
Chapter 3: Configure CIFS with Virtual CIFS Servers 32 When an event is created, the ClusterPulse process may initiate failover of the associated Virtual CIFS Server. You can configure the failover behavior with the Event Severity attribute. There are two settings: CONSIDER and IGNORE. CONSIDER. This is the default value. Events are considered when the ClusterPulse process makes failover decisions. IGNORE.
Chapter 3: Configure CIFS with Virtual CIFS Servers 33 Linux Clients Linux clients can mount Virtual File Shares using the Virtual CIFS Server address. If a mount command fails with the message “Connection Refused,” retry the command with the port=445 option. Following is an example: # mount -t smbfs -o ‘username=Administrator,uid=Administrator,port=445’ //10.11.200.
Chapter 3: Configure CIFS with Virtual CIFS Servers 34 Delete a Virtual CIFS Server To remove a Virtual CIFS Server, select that Virtual CIFS Server on the PolyServe Management Console, right-click, and select Delete. You can also enter the following at the Command Prompt: mx vfs delete | Disable or Enable a Virtual CIFS Server By default, Virtual CIFS Servers are enabled.
Chapter 3: Configure CIFS with Virtual CIFS Servers 35 Virtual File Shares Modify the Configuration To change the configuration of a Virtual File Share, select that Virtual File Share on the Servers, Virtual Hosts, or Applications tab, right-click, and select Properties. You can then modify the configuration as necessary.
Chapter 3: Configure CIFS with Virtual CIFS Servers 36 Clear Monitor Errors To clear an error, select the Virtual File Share monitor on the Servers tab, right-click, and select Clear Last Error. (On the Applications tab, right-click in the cell corresponding to the Virtual File Share and server.) You can also enter the following at the Command Prompt: mx vfs_share clear \\vfs>\ ...
A Configure Domain Controller DNS Host (A) Records This appendix describes how to configure Windows Server 2003 Domain Controller DNS Host (A) records for reliable name resolution of virtual IP addresses with CIFS. It also describes configuration for Windows 2000 Server Active Directory environments.
Appendix A: Configure Domain Controller DNS Host (A) Records 38 4. On the New Host dialog, add the name and the IP address of the virtual host. Then uncheck the “Allow any authenticated user to update DNS records with the same owner name” option. When your entries are complete, click the Add Host button. Copyright © 1999-2006 PolyServe, Inc. All rights reserved.
Appendix A: Configure Domain Controller DNS Host (A) Records 39 Windows 2000 Server Active Directory With Windows 2000 Server Active Directory environments, the only available option to not allow dynamic updating of the DNS resource records is to modify the permissions on the resource record to allow readonly access to the system user. This will eliminate the possibility of the resource record being removed upon deletion or rehosting of the virtual server. Copyright © 1999-2006 PolyServe, Inc.
Index A S Applications tab Matrix File Share 11 Virtual CIFS Server 26 scripts event severity 31 ordering 32 security 5 Start script 30 Stop script 30 C clients DNS name resolution 4 NetBIOS name resolution 4 operating systems 3 D DFS, configure 12 DNS Host (A) records 37 M Matrix File Share add 7 configuration planning 6 delete 14 modify configuration 14 monitor disable 15 enable 15 errors, clear 15 errors, view 15 probe configuration 9 on Applications tab 11 overview 2 user limit 9 N NetBIOS name r