
HP StorageWorks 1/8 Tape Autoloader User and Service Guide (August 2005)


1/8 Tape Autoloader User and Service Guide 55
Removing stuck tapes from slots
NOTE: Contact your HP support representative if a cartridge is stuck in the drive.
In the event of a severe mechanical problem with the autoloader or circumstances require you to
remove cartridges:
1. Move the power switch on the front panel to the OFF position. You may need to use the tip of a
pen or similar item to move the power switch.
2. Remove the power cable and SCSI cables from their connectors on the back panel of the
autoloader.
WARNING! To prevent injury, disconnect the power and SCSI cables before removing the
autoloader cover and keep fingers away from the fan.
3. Remove the autoloader from its rack slot, if applicable, and place it on a table or other clear
work surface.
4. Use a Torx screwdriver #10 to remove the screws that secure the mounting brackets (if the
autoloader is rackmounted) from both sides of the autoloader (see Figure 5 on page 17).
5. Remove the five screws on the back and the three screws on each side of the autoloader to
remove the autoloader cover.
6. Remove the top cover by lifting it from the back and easing it from under the front panel display
cover.
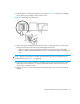
NOTE: Use caution and light force when removing the cartridge carrier as the tab is fragile and
could be damaged in this procedure.
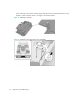
7. To remove a cartridge carrier, gently lift the cartridge carrier just above the belt and rotate it
approximately 90 degrees counterclockwise to disengage the tab from the belt (see Figure 18
and Figure 19). Continue lifting the carrier straight up to remove it from the autoloader. If the