
HP StorageWorks Storage Mirroring Enterprise Install Console (T2558-96080, February 2008)

5
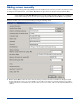
Adding servers by cloning
Once you have a server in the Install Console, you can clone that server in order to add additional servers. This saves time
because all of the fields on the Add Server dialog box are completed identically to the server you are cloning. You only have
to modify the fields required to make the server unique. See
Adding servers manually on page 3 for an explanation of each
server setting.
To clone a server, select
Server, Clone Server or right-click on the left pane and select Server, Clone. At a minimum, you
must change the Server Name. Modifications to other fields are dependent on your environment. Click OK to save the
settings and insert the server into the Install Console.
Adding servers by importing
If you have Storage Mirroring running in your environment and you have created server groups through the Management
Console, you can import the Management Console server group configuration file in order to populate servers in the Install
Console. This saves time because a list of multiple servers can quickly be created in the Install Console.
To import a server group configuration file, select
Server, Import Servers. Locate the .xml group configuration file on the
Storage Mirroring machine. This file is named by the user who was logged in when the group configuration was created. For
example, if the administrator was logged in when the group configuration was created, the file would be called
administrator.xml. Select the file and click OK. Enterprise Install Console will automatically insert each server from the
configuration file into the Install Console. You will be notified if any of the servers it is trying to insert are not available. After
the servers have been inserted, you need to modify each server to specify those fields that are not configured by default. See
Adding servers manually on page 3 for an explanation of each server setting.
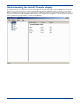
Modifying server settings
After you have inserted a server in the Install Console, you can modify any of the server settings as needed. Select Server,
Modify Server or right-click on the left pane and select Server, Modify. The Modify Server dialog box contains the same
options as the Add Server dialog, except the Remote Server Name cannot be changed. See
Adding servers manually on page
3 for an explanation of each server setting.
Removing a server
If a server is no longer needed in the Install Console, you can remove it by selecting Server, Remove Server or right-click on
the left pane and select Server, Remove.
NOTE: You can reduce the manual modifications by setting server defaults. Select File, Edit Default Server and specify
any fields that will be identical on your different servers. When servers are imported, these defaults will be
used. The Edit Defaults dialog box contains the same options as the Add Server dialog, except the Remote
Server Name is not applicable.