
HP StorageWorks Storage Mirroring Application Notes - Guidelines for Using VMware GSX Server with Storage Mirroring (T2558-96023, November 2006)


Storage Mirroring Guidelines for using VMware GSX Server with Storage Mirroring application notes 7
Configuring mirroring and replication
1. Select Start, Programs, Storage Mirroring, Management Console.
2. Double-click your source to log on.
3. Right-click the source and select Properties.
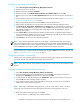
4. On the Source tab, enable Block Checksum All Files on a Difference Mirror and click OK.
5. Right-click your source and select New, Replication Set and enter the desired name for the replication
set.
6. Select the data to protect. This includes the virtual machine folder recorded in step 5 in ”Installing and
configuring software on the source” on page 6.
7. Right-click the replication set name and select Save to save the replication set.
8. Drag and drop the replication set onto the target. The Connection Manager dialog box opens.
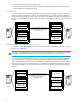
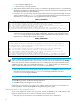
9. The Source Server, Target Server, Replication Set, and Route fields will automatically be populated. If
you have multiple IP addresses on your target, verify the Route field is set to the correct network path.
(For detailed information on connecting a source and target, see the HP StorageWorks Storage
Mirroring user's guide.)
10. Select One to One to map the replication set data from the source to an identical volume/directory
structure on the target. Make sure you select the correct mapping; if the paths do not match exactly, the
virtual server on the target will not function correctly.
11. Click Connect to start the mirror and replication processes.
NOTE: If you start the replicated virtual server on the target, or if the associated data on the target is
otherwise modified, the data on the source and target will no longer match. If the updated data on the
target is not needed, perform a full or difference with block checksum mirror from the source to the target.
If the updated data on the target is needed, restore the data from the target to the source.
Wait until mirroring is complete and the Mirror Status has changed to Idle before continuing with the next
section, ”Configuring VMware on the target” on page 7.
Configuring VMware on the target
After the mirror has completed, register the virtual machine on the target using the virtual machine folder
and virtual disk that were replicated to the target in the previous steps.
NOTE: If you want to start this virtual machine to make sure that it works, you must first isolate it from the
network.
Configure failover and begin failure monitoring
1. Select Start, Programs, Storage Mirroring, Failover Control Center.
2. Select the target from the list of available machines and click Login. If the target you need is not
displayed, click Add Target, enter the machine name, and click OK.
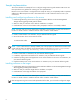
3. To add a monitor for the selected target, click Add Monitor. Type the name of the source host server
and click OK. The Monitor Settings window will open.
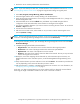
4. In the Monitor Settings window, mark the IP address that is going to failover. This is the physical
address of the source host operating system.
NOTE: Monitoring is configured for the physical source, not the virtual machine. There is no direct
monitoring of the virtual machine. When the physical source fails to respond, failover will occur.
5. Make sure all of the following settings are disabled:
• Items to Failover—IP Address(es), Server Name, Share(s)