HP StorageWorks Storage Mirroring application notes Guidelines for using MicroSoft Clustered Distributed File System with Storage Mirroring Part number: T2558–96059 First edition: April 2007
Legal and notice information © Copyright 2007 Hewlett-Packard Development Company, L.P. Hewlett-Packard Company makes no warranty of any kind with regard to this material, including, but not limited to, the implied warranties of merchantability and fitness for a particular purpose. Hewlett-Packard shall not be liable for errors contained herein or for incidental or consequential damages in connection with the furnishing, performance, or use of this material.
Document overview This document is a Storage Mirroring application note. An application note provides guidelines on the use of Storage Mirroring in a specific environment. This document contains: • Document overview—Explains what an application note contains, how it should be used, what you need to know before trying to use the application note, and where you can go for more information.
Solution overview Microsoft Distributed File System (DFS) for Windows 2003 Clusters allows for the management of file shares spread across multiple servers in an enterprise to be managed from a single namespace. Storage Mirroring can be used to provide high availability for your virtual DFS servers. This document describes the steps necessary to use a stand-alone Storage Mirroring server to monitor a clustered DFS source and to provide IP address and/or server name failover to the stand-alone target server.
b. c. d. e. Right-click the Groups folder on the left pane of the Cluster Administrator and select New, Group. Specify the Name and Description and click Next to continue. Specify none or one cluster node as the Preferred Owners. Do not specify both nodes. Otherwise, the group would failover and failback repeatedly, effectively taking the group offline, if one node stops working. Click Finish to complete the creation of the new group. You will be notified that the group was created successfully.
b. Specify the following fields on the New Resource dialog box: ame—Specify a name that identifies this resource as the IP address for the group. This name must be unique within the cluster. • Description—You can optionally add a more detailed description for this resource. • Resource type—Specify IP Address. • Group—The application group name should be selected. If it is not, select the correct group name. Click Next to continue.
f. 3. Specify the following fields on the TCP/IP Address Parameters dialog box: • Address—Enter the static IP address that will be assigned to the application’s virtual server. • Subnet mask—Enter the subnet mask associated with the IP address you just entered. • Network to use—If you have more than one route for network traffic defined, specify the network that this IP address will use. This should be the same network that the clients are using. g.
b. c. d. 8 Specify the following fields on the New Resource dialog box. • Name—Specify a name that identifies this resource as the virtual server for the application. This name must be unique within the cluster. • Description—You can optionally add a more detailed description for this resource. • Resource type—Specify Network Name. • Group—The application group name should be selected. If it is not, select the correct group name. Click Next to continue.
e. f. An IP address must be present in order for a network name to be assigned. Therefore, move the IP address resource associated with the virtual server to the Resource dependencies list and click Next to continue. Specify the Network Name Parameters by entering the virtual name of the server. This is the name that clients will look for on the network. Click Finish to complete the creation of the Network Name resource. h. Right-click the Network Name resource just created and select Properties. i.
a. b. c. d. e. 10 Right-click the group and select New, Resource. Specify the following fields on the New Resource dialog box: • Name—Specify a name that identifies the disk drive associated with the virtual server. This name must be unique within the cluster. • Description—You can optionally add a more detailed description for this resource. • Resource type—Specify Physical Disk. • Group—The application group name should be selected. If it is not, select the correct group name. Click Next to continue.
f. Specify the disk drive associated with the physical disk resource. Click Finish to complete the creation of the Physical Disk resource. Create a DFS file share resource for the new group g. 5. Before creating the clustered DFS file share, create a folder to hold the share information on the physical disk created in step 4 above. DO NOT share this folder. The cluster service will share the folder when the File Share resource is brought online. NOTE: a. Right-click the group and select New, Resource.
b. c. d. e. 12 Specify the following fields on the New Resource dialog box. • Specify a name that identifies this resource as the DFS root file share. This name must be unique within the cluster. • Description—You can optionally add a more detailed description for this resource. • Resource type—Specify File Share. • Group—The application group name should be selected. If it is not, select the correct group name. Click Next. All cluster nodes should be listed as Possible owners. Click Next.
f. g. h. i. j. Provide a Share Name and the path to the folder created to hold the DFS information. Add an optional comment and set User Limits and Permissions as desired. Click the Advanced button and select DFS root. Click OK, then Finish. Right-click on the Resource Group and select Bring Online. Click Finish to complete the creation of the resource. ® on the target server Install Storage Mirroring Install Storage Mirroring on the target server using the installation defaults.
Configure failover and begin failure monitoring Perform the following steps on the target server. 1. Stop the DFS service on the target server. 2. If a failure occurs, you will want to the services to start on the target machine automatically. To do this, create a batch file called postover.bat using the sample batch file below. The following script should be run after failover has completed. After you modify the sample scripts, save them with a new name to remove the sample_ prefix.
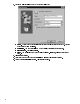
7. 8. • • • In the left pane of the Monitor Settings window, mark only the source virtual server IP address that is going to failover. Verify that the correct NIC is selected in the right-hand pane under Current IP Address(es) . Configure the Monitor Interval, Missed Packets, and Timeout. Monitor Interval—The monitor interval specifies how often, in seconds, the monitor request is sent to the source machine. The default is 5 seconds.
NOTE: 10. The scripts are processed during the same account runnint the Storage Mirroring service. Under Items to Failover, if you have more than one IP address for your virtual server, verify that only Monitored IP Addresses and Server Name are selected. For WAN failover, make sure that the IP Address(es) check box is NOT selected, and select only the Server Name box. For more information about failing over in a WAN environment, see WAN Failover/Failback Configuration on page 17.
WAN Failover/Failback Configuration If the source cluster is on a logically different network than the target server, use the following procedures to configure the solution for WAN failover/failback. Configure failover and begin failure monitoring Perform the following steps on the target server. 1. Stop the DFS service on the target server. 2.
sample_WAN_preback.bat rem ***SAMPLE*** pre-failback script for cluster-to-standalone WAN failover with DFS rem This sample batch file is provided as an example only. Because no two rem environments or configurations are exactly the same, you MUST modify rem this script in order to make the solution work in your environment. net stop DFS rem These commands remove the target server mapping and add the source virtual server. dnscmd DNSServer /RecordDelete domain.com SrceSrvrName A 143.223.9.
7. 8. • • • In the left pane of the Monitor Settings window, mark only the source virtual server IP address that is going to failover. Verify that the correct NIC is selected in the right pane under Current IP Address(es) Configure the Monitor Interval, Missed Packets, and Timeout. Monitor Interval—The monitor interval specifies how often, in seconds, the monitor request is sent to the source machine. The default is 5 seconds.
NOTE: The scripts are processed using the same account running the Storage Mirroring service. You may need to give this service account adequate permissions to modify DNS settings. 10. Under Items to Failover, verify that only the Server Name is selected. For WAN failover, make sure that the IP Address(es) check box is NOT selected, and select only the Server Name box. NOTE: Click OK to go back to the Monitor Settings dialog box, then click OK to begin monitoring the source machine.