
Veritas Storage Foundation™ 5.0.1 for Oracle RAC Installation, Configuration, and Administrator's Guide Extracts for the HP Serviceguard Storage Management Suite on HP-UX 11i v3
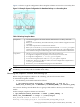
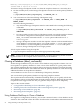
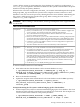
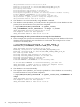
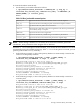
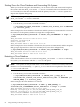
Table Of Contents
- Veritas Storage Foundation™ 5.0.1 for Oracle RAC Installation, Configuration, and Administrator's Guide Extracts for the HP Serviceguard Storage Management Suite on HP-UX 11i v3
- Table of Contents
- Preface
- 1 Introducing Serviceguard Extension for RAC
- About Serviceguard Extension for RAC
- How Serviceguard Extension for RAC Works (High-Level Perspective)
- Component Products and Processes of SG SMS Serviceguard Cluster File System for RAC
- Communication Infrastructure
- Cluster Interconnect Communication Channel
- Low-level Communication: Port Relationship Between GAB and Processes
- Cluster Volume Manager
- Cluster File System
- Oracle Disk Manager
- Additional Features of Serviceguard Extension for RAC
- 2 Planning SGeRAC Installation and Configuration
- 3 Configuring the Repository Database for Oracle
- 4 Using Storage Checkpoints and Storage Rollback
- About Storage Checkpoints and Storage Rollback in SGeRAC
- Using Storage Checkpoints and Storage Rollback for Backup and Restore
- Determining Space Requirements for Storage Checkpoints
- Performance of Storage Checkpoints
- Backing up and Recovering the Database Using Storage Checkpoints
- Guidelines for Oracle Recovery
- Using the Storage Checkpoint Command Line Interface (CLI)
- Examples of Using the Command Line Interface
- Prerequisites
- Creating or Updating the Repository Using dbed_update
- Creating Storage Checkpoints Using dbed_ckptcreate
- Displaying Storage Checkpoints Using dbed_ckptdisplay
- Mounting Storage Checkpoints Using dbed_ckptmount
- Unmounting Storage Checkpoints Using dbed_ckptumount
- Performing Storage Rollback Using dbed_ckptrollback
- Removing Storage Checkpoints Using dbed_ckptremove
- Cloning the Oracle Instance Using dbed_clonedb
- 5 Using FlashSnap for Backup and Recovery
- About Veritas Database FlashSnap
- Planning to Use Database FlashSnap
- Preparing Hosts and Storage for Database FlashSnap
- Summary of Database Snapshot Steps
- Creating a Snapplan (dbed_vmchecksnap)
- Validating a Snapplan (dbed_vmchecksnap)
- Displaying, Copying, and Removing a Snapplan (dbed_vmchecksnap)
- Creating a Snapshot (dbed_vmsnap)
- Backing Up the Database from Snapshot Volumes (dbed_vmclonedb)
- Cloning a Database (dbed_vmclonedb)
- Resynchronizing the Snapshot to Your Database
- Removing a Snapshot Volume
- 6 Investigating I/O Performance for SGeRAC: Storage Mapping
- A Troubleshooting SGeRAC

To clone the database automatically
• Use the dbed_vmclonedb command as follows:
# /opt/VRTS/bin/dbed_vmclonedb -S ORACLE_SID -g snap_dg -o
recoverdb,new_sid=new_sid[,vxdbavol=vol_name] -f SNAPPLAN [-H
ORACLE_HOME] [-r relocate_path]
Where:
Table 5-10 dbed_vmclonedb command options
Represents the name of the Oracle database used to create the snapshot.
ORACLE_SID
Represents the name of the diskgroup that contains all the snapshot volumes.
snap_dg
Specifies the ORACLE_SID for the clone database.
new_sid
Represents the volume that contains the snapplan data. This name is provided after
you run dbed_vmsnap -o snapshot.
vxdbavol
Represents the name of the snapplan file.
SNAPPLAN
Represents the ORACLE_HOME setting for the ORACLE_SID database.
ORACLE_HOME
Represents the name of the initial mount point for the snapshot image.
relocate_path
NOTE: When cloning a database on a secondary host, ensure that PRIMARY_HOST and
SECONDARY_HOST parameters in the snapplan file are different.
When the -o recoverdb option is used with dbed_vmclonedb, the clone database is recovered
automatically using all available archive logs. If the -o recoverdb option is not used, you can
perform point-in-time recovery manually.
• In the following example, a clone of the primary database is automatically created on the
same host as the primary database.
# /opt/VRTS/bin/dbed_vmclonedb -S PROD -g SNAP_PRODdg -o
recoverdb,new_sid=NEWPROD -f snap1 -r /clone
dbed_vmclonedb started at 2006-03-02 14:42:10
Mounting /clone/prod_db on /dev/vx/dsk/SNAP_PRODdg/SNAP_prod_db.
Mounting /clone/prod_ar on /dev/vx/dsk/SNAP_PRODdg/SNAP_prod_ar.
All redo-log files found.
Altering instance_name paramter in initabc.ora.
Altering instance_number paramter in initabc.ora.
Altering thread paramter in initabc.ora.
Starting automatic database recovery.
Database NEWPROD (SID=NEWPROD) is running.
dbed_vmclonedb ended at 2006-03-02 14:43:05
• In the following example, a clone of the primary database is automatically created on a
secondary host.
# /opt/VRTS/bin/dbed_vmclonedb -S PROD -g SNAP_PRODdg -o
recoverdb,new_sid=NEWPROD,vxdbavol=SNAP_arch -f snap2
dbed_vmclonedb started at 2006-03-09 23:03:40
Mounting /clone/arch on /dev/vx/dsk/SNAP_PRODdg/SNAP_arch.
Mounting /clone/prod_db on /dev/vx/dsk/SNAP_PRODdg/SNAP_prod_db.
All redo-log files found.
Altering instance_name paramter in initabc.ora.
Altering instance_number paramter in initabc.ora.
Altering thread paramter in initabc.ora.
Starting automatic database recovery.
Database NEWPROD (SID=NEWPROD) is running.
dbed_vmclonedb ended at 2006-03-09 23:04:50
Cloning a Database (dbed_vmclonedb) 79