
Veritas Storage Foundation™ 5.0.1 for Oracle RAC Installation, Configuration, and Administrator's Guide Extracts for the HP Serviceguard Storage Management Suite on HP-UX 11i v3
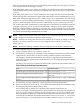

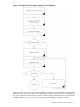
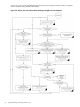
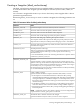

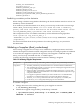
Table Of Contents
- Veritas Storage Foundation™ 5.0.1 for Oracle RAC Installation, Configuration, and Administrator's Guide Extracts for the HP Serviceguard Storage Management Suite on HP-UX 11i v3
- Table of Contents
- Preface
- 1 Introducing Serviceguard Extension for RAC
- About Serviceguard Extension for RAC
- How Serviceguard Extension for RAC Works (High-Level Perspective)
- Component Products and Processes of SG SMS Serviceguard Cluster File System for RAC
- Communication Infrastructure
- Cluster Interconnect Communication Channel
- Low-level Communication: Port Relationship Between GAB and Processes
- Cluster Volume Manager
- Cluster File System
- Oracle Disk Manager
- Additional Features of Serviceguard Extension for RAC
- 2 Planning SGeRAC Installation and Configuration
- 3 Configuring the Repository Database for Oracle
- 4 Using Storage Checkpoints and Storage Rollback
- About Storage Checkpoints and Storage Rollback in SGeRAC
- Using Storage Checkpoints and Storage Rollback for Backup and Restore
- Determining Space Requirements for Storage Checkpoints
- Performance of Storage Checkpoints
- Backing up and Recovering the Database Using Storage Checkpoints
- Guidelines for Oracle Recovery
- Using the Storage Checkpoint Command Line Interface (CLI)
- Examples of Using the Command Line Interface
- Prerequisites
- Creating or Updating the Repository Using dbed_update
- Creating Storage Checkpoints Using dbed_ckptcreate
- Displaying Storage Checkpoints Using dbed_ckptdisplay
- Mounting Storage Checkpoints Using dbed_ckptmount
- Unmounting Storage Checkpoints Using dbed_ckptumount
- Performing Storage Rollback Using dbed_ckptrollback
- Removing Storage Checkpoints Using dbed_ckptremove
- Cloning the Oracle Instance Using dbed_clonedb
- 5 Using FlashSnap for Backup and Recovery
- About Veritas Database FlashSnap
- Planning to Use Database FlashSnap
- Preparing Hosts and Storage for Database FlashSnap
- Summary of Database Snapshot Steps
- Creating a Snapplan (dbed_vmchecksnap)
- Validating a Snapplan (dbed_vmchecksnap)
- Displaying, Copying, and Removing a Snapplan (dbed_vmchecksnap)
- Creating a Snapshot (dbed_vmsnap)
- Backing Up the Database from Snapshot Volumes (dbed_vmclonedb)
- Cloning a Database (dbed_vmclonedb)
- Resynchronizing the Snapshot to Your Database
- Removing a Snapshot Volume
- 6 Investigating I/O Performance for SGeRAC: Storage Mapping
- A Troubleshooting SGeRAC

taken out of backup mode, the log files are switched to ensure that the extra redo logs are archived,
and a snapshot of the archive logs is created.
If the SNAPSHOT_MODE is set to offline, the database must be shut down before the snapshot is
created. Online redo logs and control files are required and will be used to ensure a full database
recovery.
If the SNAPSHOT_MODE is set to instant, tablespaces are not put into and out of backup mode.
Online redo logs and control files are required and will be used to ensure a full database recovery.
Both online and offline snapshots provide a valid backup copy of the database. You can use the
snapshot as a source for backing up the database or creating a clone database for decision-support
purposes. Instant snapshots do not represent a valid backup copy for point-in-time recovery.
The sections that follow explain how to create snapshots of all volumes on a database using the
snapplan. Optionally, you can use the VxVM command (vxsnap) to create volume snapshots.
However, unlike the Database FlashSnap commands, the vxsnap command does not automate
disk group content reorganization functions. For more information about the vxsnap command,
see Veritas Volume Manager Administrator's Guide.
NOTE: Make sure the volumes used by the database are configured properly before attempting
to take a snapshot. This requires superuser (root) privileges.
NOTE: Anytime you change the structure of the database (for example, by adding or deleting
datafiles, converting PFILE to SPFILE, or converting SPFILE to PFILE), you must run
dbed_update.
NOTE: Database FlashSnap commands must be run by the Oracle database administrator.
To create a snapshot image of a database
1. Create a snapshot mirror of a volume or volume set.
2. Use the dbed_vmchecksnap command to create a snapplan template and check the volume
configuration to ensure that it is valid for creating volume snapshots of the database.
The snapplan contains detailed database and volume configuration information that is
needed for snapshot creation and resynchronization. You can modify the snapplan template
with a text editor.
The dbed_vmchecksnap command can also be used to perform the tasks listed in Table 5-2.
Table 5-2 dbed_vmchecksnap Command Options
Command OptionTask
dbed_vmchecksnap -o listList all snapplans associated with a specific ORACLE_SID
dbed_vmchecksnap -o remove -f
SNAPPLAN
Remove the snapplan from the VxDBA repository
dbed_vmchecksnap -o copy -f SNAPPLAN
Copy a snapplan from the VxDBA repository to your local
directory
3. Use the dbed_vmsnap command to create snapshot volumes for the database.
4. On the secondary host, use the dbed_vmclonedb command to create a clone database using
the disk group deported from the primary host.
If the primary and secondary hosts specified in the snapplan are different, the
dbed_vmclonedb command imports the disk group that was deported from the primary
host, recovers the snapshot volumes, mounts the file systems, recovers the database, and
brings the database online with a different Oracle SID name than the primary host. If the
secondary host is different, the database name can be same. You can use the -o recoverdb
option to let dbed_vmclonedb perform an automatic database recovery, or you can use
Summary of Database Snapshot Steps 61