
Veritas Storage Foundation™ 5.0.1 for Oracle RAC Installation, Configuration, and Administrator's Guide Extracts for the HP Serviceguard Storage Management Suite on HP-UX 11i v3
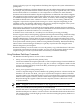
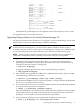
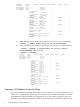
Table Of Contents
- Veritas Storage Foundation™ 5.0.1 for Oracle RAC Installation, Configuration, and Administrator's Guide Extracts for the HP Serviceguard Storage Management Suite on HP-UX 11i v3
- Table of Contents
- Preface
- 1 Introducing Serviceguard Extension for RAC
- About Serviceguard Extension for RAC
- How Serviceguard Extension for RAC Works (High-Level Perspective)
- Component Products and Processes of SG SMS Serviceguard Cluster File System for RAC
- Communication Infrastructure
- Cluster Interconnect Communication Channel
- Low-level Communication: Port Relationship Between GAB and Processes
- Cluster Volume Manager
- Cluster File System
- Oracle Disk Manager
- Additional Features of Serviceguard Extension for RAC
- 2 Planning SGeRAC Installation and Configuration
- 3 Configuring the Repository Database for Oracle
- 4 Using Storage Checkpoints and Storage Rollback
- About Storage Checkpoints and Storage Rollback in SGeRAC
- Using Storage Checkpoints and Storage Rollback for Backup and Restore
- Determining Space Requirements for Storage Checkpoints
- Performance of Storage Checkpoints
- Backing up and Recovering the Database Using Storage Checkpoints
- Guidelines for Oracle Recovery
- Using the Storage Checkpoint Command Line Interface (CLI)
- Examples of Using the Command Line Interface
- Prerequisites
- Creating or Updating the Repository Using dbed_update
- Creating Storage Checkpoints Using dbed_ckptcreate
- Displaying Storage Checkpoints Using dbed_ckptdisplay
- Mounting Storage Checkpoints Using dbed_ckptmount
- Unmounting Storage Checkpoints Using dbed_ckptumount
- Performing Storage Rollback Using dbed_ckptrollback
- Removing Storage Checkpoints Using dbed_ckptremove
- Cloning the Oracle Instance Using dbed_clonedb
- 5 Using FlashSnap for Backup and Recovery
- About Veritas Database FlashSnap
- Planning to Use Database FlashSnap
- Preparing Hosts and Storage for Database FlashSnap
- Summary of Database Snapshot Steps
- Creating a Snapplan (dbed_vmchecksnap)
- Validating a Snapplan (dbed_vmchecksnap)
- Displaying, Copying, and Removing a Snapplan (dbed_vmchecksnap)
- Creating a Snapshot (dbed_vmsnap)
- Backing Up the Database from Snapshot Volumes (dbed_vmclonedb)
- Cloning a Database (dbed_vmclonedb)
- Resynchronizing the Snapshot to Your Database
- Removing a Snapshot Volume
- 6 Investigating I/O Performance for SGeRAC: Storage Mapping
- A Troubleshooting SGeRAC
5. Use the following command to dissociate a DCO object from an earlier version of VxVM,
DCO volume and snap objects from the volume:
# vxassist [-g diskgroup] remove log volume logtype=dco
6. Use the following command on the volume to upgrade it:
# vxsnap [-g diskgroup] prepare volume alloc=”disk_name1,disk_name2”
Provide two disk names to avoid overlapping the storage of the snapshot DCO plex with
any other non-moving data or DCO plexes.
The vxsnap prepare command automatically enables persistent FastResync on the volume
and on any snapshots that are generated from it. It also associates a DCO and DCO log
volume with the volume to be snapshot.
7. To view the existing DCO plexes and see whether there are enough for the existing data
plexes, enter:
# vxprint -g diskgroup
There needs to be one DCO plex for each existing data plex.
8. If there are not enough DCO plexes for the existing data plexes, create more DCO plexes:
# vxsnap [-g diskgroup] addmir dco_volume_name [alloc=disk_name]
where dco_volume_name is the name of the DCO volume you are creating.
9. If the plex is in a SNAPDONE state, convert it to an ACTIVE state:
# vxplex [-g diskgroup] convert state=ACTIVE data_plex
10. Convert the data plexes to a SNAPDONE state and associate a DCO plex with the data plex
that is used for snapshot operations:
# vxplex [-g diskgroup] -o dcoplex=dco_plex_name convert
\state=SNAPDONE data_plex
where dco_plex_name is the name of the DCO plex you are creating.
In this example, the volume, data_vol, is upgraded to make use of VxVM Draft features.
1. Upgrade the disk group, PRODdg.
# vxdg upgrade PRODdg
2. Remove the DRL plexes or subdisks, belonging to an earlier version of VxVM, from the
volume to be upgraded.
# vxassist -g PRODdg remove log data_vol logtype=drl
3. Reattach any snapshot volume back to the primary volume to be upgraded.
# vxsnap -g PRODdg snapback SNAP-data_vol
4. Turn off FastResync on the volume to be upgraded.
# vxvol -g PRODdg set fastresync=off data_vol
5. Disassociate and remove any older DCO object and DCO volumes.
# vxassist -g PRODdg remove log data_vol logtype=dco
6. Upgrade the volume by associating a new DCO object and DCO volume.
# vxsnap -g PRODdg prepare data_vol alloc="PRODdg01 PRODdg02"
7. View the existing DCO plexes and plex state.
• Scenario 1
In this scenario, there are enough DCO plexes for the data plexes. Also, no data plex is
associated with a DCO plex.
# vxprint -g PRODdg
58 Using FlashSnap for Backup and Recovery