
Veritas Storage Foundation™ 5.0.1 for Oracle RAC Installation, Configuration, and Administrator's Guide Extracts for the HP Serviceguard Storage Management Suite on HP-UX 11i v3
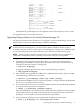
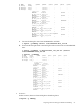
Table Of Contents
- Veritas Storage Foundation™ 5.0.1 for Oracle RAC Installation, Configuration, and Administrator's Guide Extracts for the HP Serviceguard Storage Management Suite on HP-UX 11i v3
- Table of Contents
- Preface
- 1 Introducing Serviceguard Extension for RAC
- About Serviceguard Extension for RAC
- How Serviceguard Extension for RAC Works (High-Level Perspective)
- Component Products and Processes of SG SMS Serviceguard Cluster File System for RAC
- Communication Infrastructure
- Cluster Interconnect Communication Channel
- Low-level Communication: Port Relationship Between GAB and Processes
- Cluster Volume Manager
- Cluster File System
- Oracle Disk Manager
- Additional Features of Serviceguard Extension for RAC
- 2 Planning SGeRAC Installation and Configuration
- 3 Configuring the Repository Database for Oracle
- 4 Using Storage Checkpoints and Storage Rollback
- About Storage Checkpoints and Storage Rollback in SGeRAC
- Using Storage Checkpoints and Storage Rollback for Backup and Restore
- Determining Space Requirements for Storage Checkpoints
- Performance of Storage Checkpoints
- Backing up and Recovering the Database Using Storage Checkpoints
- Guidelines for Oracle Recovery
- Using the Storage Checkpoint Command Line Interface (CLI)
- Examples of Using the Command Line Interface
- Prerequisites
- Creating or Updating the Repository Using dbed_update
- Creating Storage Checkpoints Using dbed_ckptcreate
- Displaying Storage Checkpoints Using dbed_ckptdisplay
- Mounting Storage Checkpoints Using dbed_ckptmount
- Unmounting Storage Checkpoints Using dbed_ckptumount
- Performing Storage Rollback Using dbed_ckptrollback
- Removing Storage Checkpoints Using dbed_ckptremove
- Cloning the Oracle Instance Using dbed_clonedb
- 5 Using FlashSnap for Backup and Recovery
- About Veritas Database FlashSnap
- Planning to Use Database FlashSnap
- Preparing Hosts and Storage for Database FlashSnap
- Summary of Database Snapshot Steps
- Creating a Snapplan (dbed_vmchecksnap)
- Validating a Snapplan (dbed_vmchecksnap)
- Displaying, Copying, and Removing a Snapplan (dbed_vmchecksnap)
- Creating a Snapshot (dbed_vmsnap)
- Backing Up the Database from Snapshot Volumes (dbed_vmclonedb)
- Cloning a Database (dbed_vmclonedb)
- Resynchronizing the Snapshot to Your Database
- Removing a Snapshot Volume
- 6 Investigating I/O Performance for SGeRAC: Storage Mapping
- A Troubleshooting SGeRAC

v data_vol fsgen
ENABLED 4194304 - ACTIVE - -
pl data_vol-01 data_vol
ENABLED 4194304 - ACTIVE - -
sd PRODdg03-01 data_vol-01
ENABLED 4194304 0 - - -
pl data_vol-02 data_vol
ENABLED 4194304 - SNAPDONE - -
sd PRODdg02-01 data_vol-02
ENABLED 4194304 0 - - -
dc data_vol_dco data_vol
- - - - - -
v data_vol_dcl gen
ENABLED 560 - ACTIVE - -
pl data_vol_dcl-01 data_vol_dcl ENABLED
560 - ACTIVE - -
sd PRODdg01-01 data_vol_dcl-01 ENABLED
560 0 - - -
pl data_vol_dcl-02 data_vol_dcl DISABLED
560 - DCOSNP - -
sd PRODdg02-02 data_vol_dcl-02 ENABLED
560 0 - - -
Identify that the specified plex is in the snapdone state. In this example, it is data_vol-02.
The snapshot mirror is now ready to be used.
Upgrading Existing Volumes to Use Veritas Volume Manager 5.0
The procedure in this section describes how to upgrade a volume created using a version older
than VxVM 5.0 so that it can take advantage of database FlashSnap.
NOTE: The plexes of the DCO volume require persistent storage space on disk to be available.
To make room for the DCO plexes, you may need to add extra disks to the disk group, or
reconfigure existing volumes to free up space in the disk group. Another way to add disk space
is to use the disk group move feature to bring in spare disks from a different disk group.
NOTE: Existing snapshot volumes created by the vxassist command are not supported. A
combination of snapshot volumes created by vxassist and vxsnap are not supported.
To upgrade an existing volume created with an earlier version of VxVM:
1. Upgrade the disk group that contains the volume, to a version 120 or higher, before
performing the remainder of the procedure described in this section. Use the following
command to check the version of a disk group:
# vxdg list diskgroup
To upgrade a disk group to the latest version, use the following command:
# vxdg upgrade diskgroup
2. If the volume to be upgraded has a DRL plex or subdisk from an earlier version of VxVM,
use the following command to remove this:
# vxassist [-g diskgroup] remove log volume [nlog=n]
Use the optional attribute nlog=n to specify the number, n, of logs to be removed. By default,
the vxassist command removes one log.
3. For a volume that has one or more associated snapshot volumes, use the following command
to reattach and resynchronize each snapshot:
# vxsnap [-g diskgroup] snapback snapvol
If persistent FastResync was enabled on the volume before the snapshot was taken, the data
in the snapshot plexes is quickly resynchronized from the original volume. If persistent
FastResync was not enabled, a full resynchronization is performed.
4. Use the following command to turn off persistent FastResync for the volume:
# vxvol [-g diskgroup] set fastresync=off volume
Preparing Hosts and Storage for Database FlashSnap 57