
Veritas Storage Foundation™ 5.0.1 for Oracle RAC Installation, Configuration, and Administrator's Guide Extracts for the HP Serviceguard Storage Management Suite on HP-UX 11i v3
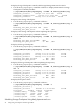
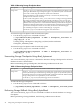
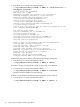
Table Of Contents
- Veritas Storage Foundation™ 5.0.1 for Oracle RAC Installation, Configuration, and Administrator's Guide Extracts for the HP Serviceguard Storage Management Suite on HP-UX 11i v3
- Table of Contents
- Preface
- 1 Introducing Serviceguard Extension for RAC
- About Serviceguard Extension for RAC
- How Serviceguard Extension for RAC Works (High-Level Perspective)
- Component Products and Processes of SG SMS Serviceguard Cluster File System for RAC
- Communication Infrastructure
- Cluster Interconnect Communication Channel
- Low-level Communication: Port Relationship Between GAB and Processes
- Cluster Volume Manager
- Cluster File System
- Oracle Disk Manager
- Additional Features of Serviceguard Extension for RAC
- 2 Planning SGeRAC Installation and Configuration
- 3 Configuring the Repository Database for Oracle
- 4 Using Storage Checkpoints and Storage Rollback
- About Storage Checkpoints and Storage Rollback in SGeRAC
- Using Storage Checkpoints and Storage Rollback for Backup and Restore
- Determining Space Requirements for Storage Checkpoints
- Performance of Storage Checkpoints
- Backing up and Recovering the Database Using Storage Checkpoints
- Guidelines for Oracle Recovery
- Using the Storage Checkpoint Command Line Interface (CLI)
- Examples of Using the Command Line Interface
- Prerequisites
- Creating or Updating the Repository Using dbed_update
- Creating Storage Checkpoints Using dbed_ckptcreate
- Displaying Storage Checkpoints Using dbed_ckptdisplay
- Mounting Storage Checkpoints Using dbed_ckptmount
- Unmounting Storage Checkpoints Using dbed_ckptumount
- Performing Storage Rollback Using dbed_ckptrollback
- Removing Storage Checkpoints Using dbed_ckptremove
- Cloning the Oracle Instance Using dbed_clonedb
- 5 Using FlashSnap for Backup and Recovery
- About Veritas Database FlashSnap
- Planning to Use Database FlashSnap
- Preparing Hosts and Storage for Database FlashSnap
- Summary of Database Snapshot Steps
- Creating a Snapplan (dbed_vmchecksnap)
- Validating a Snapplan (dbed_vmchecksnap)
- Displaying, Copying, and Removing a Snapplan (dbed_vmchecksnap)
- Creating a Snapshot (dbed_vmsnap)
- Backing Up the Database from Snapshot Volumes (dbed_vmclonedb)
- Cloning a Database (dbed_vmclonedb)
- Resynchronizing the Snapshot to Your Database
- Removing a Snapshot Volume
- 6 Investigating I/O Performance for SGeRAC: Storage Mapping
- A Troubleshooting SGeRAC

To remove Storage Checkpoints
• Use the dbed_ckptremove command as follows:
# /opt/VRTS/bin/dbed_ckptremove -S PROD -c Checkpoint_971672042_wr001
Cloning the Oracle Instance Using dbed_clonedb
You can use the dbed_clonedb command to clone an Oracle instance using a Storage Checkpoint.
Cloning an existing database using a Storage Checkpoint must be done on the same host.
You have the option to manually or automatically recover the database when using the
dbed_clonedb command:
Manual (interactive) recovery, which requires using the -i option, of the clone database allows
the user to control the degree of recovery by specifying which archive log files are to be replayed.
Automatic (non-interactive) recovery, which is the default usage of the command, recovers the
entire database and replays all of the archive logs. You will not be prompted for any archive log
names.
Before cloning the Oracle instance, the following conditions must be met:
Table 4-12 Cloning Oracle Instance Notes
• You must first create a Storage Checkpoint. You must be logged in as the database
administrator.
• Make sure you have enough space and system resources to create a clone database on your
system.
• A clone database takes up as much memory and machine resources as the primary database.
Prerequisites
• The dbed_clonedb command is used to create a copy of a database, cloning all existing
database files to new locations.
• The ORACLE_SID and ORACLE_HOME environment variables must be set to the primary
database.
• It is assumed that the user has a basic understanding of the database recovery process.
• See the dbed_clonedb(1M) manual page for more information.
Usage Notes
• Note that the database cloning using Instant Checkpoint is not supported for SGeRAC.
• When you clone the database by using Checkpoint, the node can be any node in the same
SGeRAC cluster but the archive log destination is required to be on CFS file system.
Otherwise, you must manually copy the archive log files.
Limitations for
SGeRAC
Table 4-13 lists the options for the dbed_clonedb command.
Table 4-13 dbed_clonedb Command Options
DescriptionOption
Specifies the name of the new Oracle SID, which will be the name of the new database
instance.
-S CLONE_SID
Indicates the new mount point of the Storage Checkpoint.
-m MOUNT_POINT
Indicates the name of the Storage Checkpoint.
-c CKPT_NAME
Runs the command in interactive mode where you must respond to prompts by the
system. The default mode is non-interactive. (Optional)
-i
Shuts down the clone database and unmounts the Storage Checkpoint file system.
-o umount
Mounts the Storage Checkpoint file system and starts the clone database. The -o restartdb
option will not attempt to recover the clone database.
-o restartdb
Used with the-o umount option. If the-d option is specified, the Storage Checkpoint
used to create the clone database is removed along with the clone database.
-d
46 Using Storage Checkpoints and Storage Rollback