
Veritas Storage Foundation™ 5.0.1 for Oracle RAC Installation, Configuration, and Administrator's Guide Extracts for the HP Serviceguard Storage Management Suite on HP-UX 11i v3
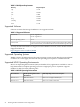
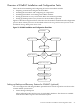

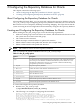

Table Of Contents
- Veritas Storage Foundation™ 5.0.1 for Oracle RAC Installation, Configuration, and Administrator's Guide Extracts for the HP Serviceguard Storage Management Suite on HP-UX 11i v3
- Table of Contents
- Preface
- 1 Introducing Serviceguard Extension for RAC
- About Serviceguard Extension for RAC
- How Serviceguard Extension for RAC Works (High-Level Perspective)
- Component Products and Processes of SG SMS Serviceguard Cluster File System for RAC
- Communication Infrastructure
- Cluster Interconnect Communication Channel
- Low-level Communication: Port Relationship Between GAB and Processes
- Cluster Volume Manager
- Cluster File System
- Oracle Disk Manager
- Additional Features of Serviceguard Extension for RAC
- 2 Planning SGeRAC Installation and Configuration
- 3 Configuring the Repository Database for Oracle
- 4 Using Storage Checkpoints and Storage Rollback
- About Storage Checkpoints and Storage Rollback in SGeRAC
- Using Storage Checkpoints and Storage Rollback for Backup and Restore
- Determining Space Requirements for Storage Checkpoints
- Performance of Storage Checkpoints
- Backing up and Recovering the Database Using Storage Checkpoints
- Guidelines for Oracle Recovery
- Using the Storage Checkpoint Command Line Interface (CLI)
- Examples of Using the Command Line Interface
- Prerequisites
- Creating or Updating the Repository Using dbed_update
- Creating Storage Checkpoints Using dbed_ckptcreate
- Displaying Storage Checkpoints Using dbed_ckptdisplay
- Mounting Storage Checkpoints Using dbed_ckptmount
- Unmounting Storage Checkpoints Using dbed_ckptumount
- Performing Storage Rollback Using dbed_ckptrollback
- Removing Storage Checkpoints Using dbed_ckptremove
- Cloning the Oracle Instance Using dbed_clonedb
- 5 Using FlashSnap for Backup and Recovery
- About Veritas Database FlashSnap
- Planning to Use Database FlashSnap
- Preparing Hosts and Storage for Database FlashSnap
- Summary of Database Snapshot Steps
- Creating a Snapplan (dbed_vmchecksnap)
- Validating a Snapplan (dbed_vmchecksnap)
- Displaying, Copying, and Removing a Snapplan (dbed_vmchecksnap)
- Creating a Snapshot (dbed_vmsnap)
- Backing Up the Database from Snapshot Volumes (dbed_vmclonedb)
- Cloning a Database (dbed_vmclonedb)
- Resynchronizing the Snapshot to Your Database
- Removing a Snapshot Volume
- 6 Investigating I/O Performance for SGeRAC: Storage Mapping
- A Troubleshooting SGeRAC
* A public NIC used by each system in the cluster.
* A Virtual IP address and netmask.
Press enter to continue.
Enter Veritas filesystem mount point for SFORA repository: /sfua_rep
Enter the NIC for system galaxy for HA Repository configuration:lan0
Enter the NIC for system nebula for HA Repository configuration:lan0
Enter the Virtual IP address for repository failover:10.182.186.249
Enter the netmask for public NIC interface:255.255.0.0
Following information will be used for SFORA HA configuration:
Public IP address: 10.182.186.249 Subnet mask: 255.255.0.0
Public interface: galaxy-lan0 nebula-lan0
Mount point: /sfua_rep
Volume Name for mount point: dbed_rep
Diskgroup for mount point: sfua_rep
Is this correct (y/n/q) [y]? y
Repository database configured successfully for HA.
3. If you are upgrading, migrate your old repository information into the new repository. If
you are installing or upgrading Veritas Storage Foundation for Oracle, run the dbed_update
command.
Setting Administrative Permissions
To allow database administrators to administer a database using SF Oracle RAC, you must change
permission settings. During SGeRAC installation, you are asked if you want to allow database
administrators access. If you did not change permissions installation, you can do so at a later
time.
The default settings at installation time for the /opt/VRTSdbed directory allow only the root
login to access the directory.
To enable access for users other than root
1. To enable the user “oracle” access to the /opt/VRTSdbeddirectory, use the chown and
chmod commands, as follows:
# chown oracle /opt/VRTSdbed
# chmod 500 /opt/VRTSdbed
2. To allow users in the group “dba” access to the /opt/VRTSdbed directory, use the chgrp
and chmod commands, as follows:
# chgrp dba /opt/VRTSdbed
# chmod 550 /opt/VRTSdbed
30 Configuring the Repository Database for Oracle