
Veritas Storage Foundation™ 5.0.1 for Oracle RAC Installation, Configuration, and Administrator's Guide Extracts for the HP Serviceguard Storage Management Suite on HP-UX 11i v3
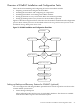

Table Of Contents
- Veritas Storage Foundation™ 5.0.1 for Oracle RAC Installation, Configuration, and Administrator's Guide Extracts for the HP Serviceguard Storage Management Suite on HP-UX 11i v3
- Table of Contents
- Preface
- 1 Introducing Serviceguard Extension for RAC
- About Serviceguard Extension for RAC
- How Serviceguard Extension for RAC Works (High-Level Perspective)
- Component Products and Processes of SG SMS Serviceguard Cluster File System for RAC
- Communication Infrastructure
- Cluster Interconnect Communication Channel
- Low-level Communication: Port Relationship Between GAB and Processes
- Cluster Volume Manager
- Cluster File System
- Oracle Disk Manager
- Additional Features of Serviceguard Extension for RAC
- 2 Planning SGeRAC Installation and Configuration
- 3 Configuring the Repository Database for Oracle
- 4 Using Storage Checkpoints and Storage Rollback
- About Storage Checkpoints and Storage Rollback in SGeRAC
- Using Storage Checkpoints and Storage Rollback for Backup and Restore
- Determining Space Requirements for Storage Checkpoints
- Performance of Storage Checkpoints
- Backing up and Recovering the Database Using Storage Checkpoints
- Guidelines for Oracle Recovery
- Using the Storage Checkpoint Command Line Interface (CLI)
- Examples of Using the Command Line Interface
- Prerequisites
- Creating or Updating the Repository Using dbed_update
- Creating Storage Checkpoints Using dbed_ckptcreate
- Displaying Storage Checkpoints Using dbed_ckptdisplay
- Mounting Storage Checkpoints Using dbed_ckptmount
- Unmounting Storage Checkpoints Using dbed_ckptumount
- Performing Storage Rollback Using dbed_ckptrollback
- Removing Storage Checkpoints Using dbed_ckptremove
- Cloning the Oracle Instance Using dbed_clonedb
- 5 Using FlashSnap for Backup and Recovery
- About Veritas Database FlashSnap
- Planning to Use Database FlashSnap
- Preparing Hosts and Storage for Database FlashSnap
- Summary of Database Snapshot Steps
- Creating a Snapplan (dbed_vmchecksnap)
- Validating a Snapplan (dbed_vmchecksnap)
- Displaying, Copying, and Removing a Snapplan (dbed_vmchecksnap)
- Creating a Snapshot (dbed_vmsnap)
- Backing Up the Database from Snapshot Volumes (dbed_vmclonedb)
- Cloning a Database (dbed_vmclonedb)
- Resynchronizing the Snapshot to Your Database
- Removing a Snapshot Volume
- 6 Investigating I/O Performance for SGeRAC: Storage Mapping
- A Troubleshooting SGeRAC
# vxdg -g shared_disk_group set activation=sw
• On the slave nodes, enter:
# vxdg -g shared_disk_group set activation=sw
Refer to the description of disk group activation modes in the Veritas Volume Manager
Administrator's Guide for more information.
Deporting and Importing Shared Disk Groups
Shared disk groups in an SGeRAC environment are configured for “Autoimport” at the time of
CVM startup. If the user manually deports the shared disk group on the CVM master, the disk
group is deported on all nodes. To reimport the disk group, the user must import the disk group
as a shared group from the CVM master.
• To deport a shared disk group, use the following command on the CVM master:
# vxdg deport shared_disk_group
• To import a shared disk group, use the following command on the CVM master:
# vxdg -s import shared_disk_group
• To import a disk group as a standalone disk group, deport it from the CVM master and use
the following command on any node:
# vxdg -C import shared_disk_group
• To reimport a disk group as a shared disk group, deport it from the standalone node and
use the following command on the CVM master node:
# vxdg -C -s import shared_disk_group
Reviewing Limitations of Shared Disk Groups
The cluster functionality of VxVM (CVM) does not support RAID-5 volumes or task monitoring
for shared disk groups in a cluster. These features can function in private disk groups attached
to specific nodes of a cluster. Online relayout is available provided it does not involve RAID-5
volumes.
The boot disk group (usually aliased as bootdg) is a private group that cannot be shared in a
cluster.
CVM only provides access to raw device; it does not support shared access to file systems in
shared volumes unless you install and configure the appropriate software, such as Veritas Cluster
File System (CFS). If a shared disk group contains unsupported objects, deport the group and
reimport it as a private group on any node. Reorganize the volumes into layouts supported for
shared disk groups, and then deport and reimport the group as a shared one.
About Raw Volumes Versus CFS for Data Files
Keep these points in mind about raw volumes and CFS for data files:
• If you use file-system-based data files, the file systems containing these files must be located
on shared disks. Create the same file system mount point on each node.
• If you use raw devices, such as VxVM volumes, set the permissions for the volumes to be
owned permanently by the database account.
For example, type:
# vxedit -g dgname set group=oracle owner=oracle mode 660 \
/dev/vx/rdsk/dgname/volume_name
VxVM sets volume permissions on import. The VxVM volume, and any file system that is
created in it, must be owned by the Oracle database account.
26 Planning SGeRAC Installation and Configuration