
Veritas Storage Foundation™ 5.0.1 for Oracle RAC Installation, Configuration, and Administrator's Guide Extracts for the HP Serviceguard Storage Management Suite on HP-UX 11i v3
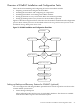

Table Of Contents
- Veritas Storage Foundation™ 5.0.1 for Oracle RAC Installation, Configuration, and Administrator's Guide Extracts for the HP Serviceguard Storage Management Suite on HP-UX 11i v3
- Table of Contents
- Preface
- 1 Introducing Serviceguard Extension for RAC
- About Serviceguard Extension for RAC
- How Serviceguard Extension for RAC Works (High-Level Perspective)
- Component Products and Processes of SG SMS Serviceguard Cluster File System for RAC
- Communication Infrastructure
- Cluster Interconnect Communication Channel
- Low-level Communication: Port Relationship Between GAB and Processes
- Cluster Volume Manager
- Cluster File System
- Oracle Disk Manager
- Additional Features of Serviceguard Extension for RAC
- 2 Planning SGeRAC Installation and Configuration
- 3 Configuring the Repository Database for Oracle
- 4 Using Storage Checkpoints and Storage Rollback
- About Storage Checkpoints and Storage Rollback in SGeRAC
- Using Storage Checkpoints and Storage Rollback for Backup and Restore
- Determining Space Requirements for Storage Checkpoints
- Performance of Storage Checkpoints
- Backing up and Recovering the Database Using Storage Checkpoints
- Guidelines for Oracle Recovery
- Using the Storage Checkpoint Command Line Interface (CLI)
- Examples of Using the Command Line Interface
- Prerequisites
- Creating or Updating the Repository Using dbed_update
- Creating Storage Checkpoints Using dbed_ckptcreate
- Displaying Storage Checkpoints Using dbed_ckptdisplay
- Mounting Storage Checkpoints Using dbed_ckptmount
- Unmounting Storage Checkpoints Using dbed_ckptumount
- Performing Storage Rollback Using dbed_ckptrollback
- Removing Storage Checkpoints Using dbed_ckptremove
- Cloning the Oracle Instance Using dbed_clonedb
- 5 Using FlashSnap for Backup and Recovery
- About Veritas Database FlashSnap
- Planning to Use Database FlashSnap
- Preparing Hosts and Storage for Database FlashSnap
- Summary of Database Snapshot Steps
- Creating a Snapplan (dbed_vmchecksnap)
- Validating a Snapplan (dbed_vmchecksnap)
- Displaying, Copying, and Removing a Snapplan (dbed_vmchecksnap)
- Creating a Snapshot (dbed_vmsnap)
- Backing Up the Database from Snapshot Volumes (dbed_vmclonedb)
- Cloning a Database (dbed_vmclonedb)
- Resynchronizing the Snapshot to Your Database
- Removing a Snapshot Volume
- 6 Investigating I/O Performance for SGeRAC: Storage Mapping
- A Troubleshooting SGeRAC

Coordinating CVM and CFS Configurations
After installing SGeRAC, a VCS cluster attribute (HacliUserLevel) is set to give root the ability
to run commands on remote systems by way of the cluster interconnect. CFS takes advantage
of this mechanism to enable you to perform file system operations requiring the primary node
be initiated on secondary nodes and carried out on the primary node transparently.
If you reset this attribute, be aware of which node is the primary for certain file system operations
and perform those tasks from that node. Unlike a non-RAC environment, you cannot run a
sequence of VxVM and VxFS commands, such as resizing a volume and a file system, on the
same node unless it is both the CVM master and CFS primary node.
About Shared Disk Groups
Make sure you review the following general information when working with disk groups and
volumes. For complete details on creating and managing shared disk groups, refer to the Veritas
Volume Manager Administrator's Guide available on the SG SMS media and at: http://docs.hp.com/
en/oshpux11iv2.html#VxVM
Viewing Information on a Disk Group
• To display information about a specific disk group, type:
# vxdg list disk_group
Checking the Connectivity Policy on a Shared Disk Group
By default, the connectivity policy for a shared disk group is set to “global.” This setting protects
against possible data corruption and causes all nodes in the cluster to detach from the disk group
when any node reports a disk failure.
The output of the vxdg list shared_disk_group command includes the following
line:detach-policy: global
• To change the connectivity policy for a disk group from “local” to “global,” type:
# vxedit set diskdetpolicy=global shared_disk_group
Determining Whether a Node is CVM Master or Slave
• On one node (nebula), determine whether the node is the master or slave:
# vxdctl -c mode
• On nebula, which is the slave, the output shows:
mode: enabled: cluster active - SLAVE
master: galaxy
• On galaxy, which is the master, the output shows:
mode: enabled: cluster active - MASTER
master:galaxy
Enabling Write Access to Volumes in the Disk Groups
By default, the activation mode for shared disk groups is inactive (set to off). To create databases
on the shared volumes, enable the write access to the volumes:
• On the CVM master node, enter:
# vxdg -s import shared_disk_group
# vxvol -g shared_disk_group startall
About CVM and CFS in an SGeRAC Environment 25