
Veritas Storage Foundation™ 5.0.1 for Oracle RAC Installation, Configuration, and Administrator's Guide Extracts for the HP Serviceguard Storage Management Suite on HP-UX 11i v3

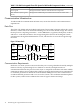
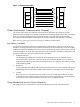

Table Of Contents
- Veritas Storage Foundation™ 5.0.1 for Oracle RAC Installation, Configuration, and Administrator's Guide Extracts for the HP Serviceguard Storage Management Suite on HP-UX 11i v3
- Table of Contents
- Preface
- 1 Introducing Serviceguard Extension for RAC
- About Serviceguard Extension for RAC
- How Serviceguard Extension for RAC Works (High-Level Perspective)
- Component Products and Processes of SG SMS Serviceguard Cluster File System for RAC
- Communication Infrastructure
- Cluster Interconnect Communication Channel
- Low-level Communication: Port Relationship Between GAB and Processes
- Cluster Volume Manager
- Cluster File System
- Oracle Disk Manager
- Additional Features of Serviceguard Extension for RAC
- 2 Planning SGeRAC Installation and Configuration
- 3 Configuring the Repository Database for Oracle
- 4 Using Storage Checkpoints and Storage Rollback
- About Storage Checkpoints and Storage Rollback in SGeRAC
- Using Storage Checkpoints and Storage Rollback for Backup and Restore
- Determining Space Requirements for Storage Checkpoints
- Performance of Storage Checkpoints
- Backing up and Recovering the Database Using Storage Checkpoints
- Guidelines for Oracle Recovery
- Using the Storage Checkpoint Command Line Interface (CLI)
- Examples of Using the Command Line Interface
- Prerequisites
- Creating or Updating the Repository Using dbed_update
- Creating Storage Checkpoints Using dbed_ckptcreate
- Displaying Storage Checkpoints Using dbed_ckptdisplay
- Mounting Storage Checkpoints Using dbed_ckptmount
- Unmounting Storage Checkpoints Using dbed_ckptumount
- Performing Storage Rollback Using dbed_ckptrollback
- Removing Storage Checkpoints Using dbed_ckptremove
- Cloning the Oracle Instance Using dbed_clonedb
- 5 Using FlashSnap for Backup and Recovery
- About Veritas Database FlashSnap
- Planning to Use Database FlashSnap
- Preparing Hosts and Storage for Database FlashSnap
- Summary of Database Snapshot Steps
- Creating a Snapplan (dbed_vmchecksnap)
- Validating a Snapplan (dbed_vmchecksnap)
- Displaying, Copying, and Removing a Snapplan (dbed_vmchecksnap)
- Creating a Snapshot (dbed_vmsnap)
- Backing Up the Database from Snapshot Volumes (dbed_vmclonedb)
- Cloning a Database (dbed_vmclonedb)
- Resynchronizing the Snapshot to Your Database
- Removing a Snapshot Volume
- 6 Investigating I/O Performance for SGeRAC: Storage Mapping
- A Troubleshooting SGeRAC
in the cluster to manage all storage. All other nodes immediately recognize any changes in disk
group and volume configuration with no interaction.
CVM Architecture
CVM is designed with a “master and slave” architecture. One node in the cluster acts as the
configuration master for logical volume management, and all other nodes are slaves. Any node
can take over as master if the existing master fails. The CVM master exists on a per-cluster basis
and uses GAB and LLT to transport its configuration data.
Just as with VxVM, the Volume Manager configuration daemon, vxconfigd, maintains the
configuration of logical volumes. This daemon handles changes to the volumes by updating the
operating system at the kernel level. For example, if a mirror of a volume fails, the mirror detaches
from the volume and vxconfigd determines the proper course of action, updates the new volume
layout, and informs the kernel of a new volume layout. CVM extends this behavior across multiple
nodes and propagates volume changes to the master vxconfigd. (You must perform
operator-initiated changes on the master node.) The vxconfigd process on the master pushes
these changes out to slave vxconfigd processes, each of which updates the local kernel.
CVM does not impose any write locking between nodes. Each node is free to update any area
of the storage. All data integrity is the responsibility of the upper application. From an application
perspective, standalone systems access logical volumes in the same way as CVM systems.
CVM imposes a “Uniform Shared Storage” model. All nodes must connect to the same disk sets
for a given disk group. Any node unable to detect the entire set of physical disks for a given disk
group cannot import the group. If a node loses contact with a specific disk, CVM excludes the
node from participating in the use of that disk.
CVM Communication
CVM communication involves various GAB ports for different types of communication.
Port W
Most CVM communication uses port w for vxconfigd communications. During any change in
volume configuration, such as volume creation, plex attachment or detachment, and volume
resizing, vxconfigd on the master node uses port w to share this information with slave nodes.
When all slaves use port w to acknowledge the new configuration as the next active configuration,
the master updates this record to the disk headers in the VxVM private region for the disk group
as the next configuration.
Port V
CVM uses port v for kernel-to-kernel communication. During specific configuration events,
certain actions require coordination across all nodes. An example of synchronizing events is a
resize operation. CVM must ensure all nodes see the new or old size, but never a mix of size
among members.
CVM also uses this port to obtain cluster membership from GAB and determine the status of
other CVM members in the cluster.
Cluster File System
CFS enables you to simultaneously mount the same file system on multiple nodes and is an
extension of the industry-standard Veritas File System. Unlike other file systems which send
data through another node to the storage, CFS is a true SAN file system. All data traffic takes
place over the storage area network (SAN), and only the metadata traverses the cluster
interconnect.
In addition to using the SAN fabric for reading and writing data, CFS offers storage checkpoints
and rollback for backup and recovery.
Cluster File System 17