
VERITAS Storage Foundation 4.1 Cluster File System HP Serviceguard Storage Management Suite Extracts, December 2005


Creating a Dynamic (Shared) Volume
34 Installation and Administration Guide
Creating a Dynamic (Shared) Volume
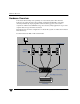
▼ To create a dynamic volume, on the CVM master node
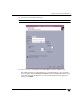
1. Right-click a dynamic disk group in the tree view of the VEA right pane and select
New Volume from the context menu. The Create Volume wizard appears.
You can also select the command from the Actions menu or click the New Volume
tool on the toolbar (the third tool from the left side of the toolbar).
Note The Activation Mode must be set to SW (shared write).
2. Click Next to continue. The screen for selecting attributes comes up. Enter a Group
name for the volume from the pull-down list.
3. Type in the Volume Name. This is a Volume Manager-specific name that is used in
some Volume Manager commands. It is different from the volume label for the file
system.
4. Specify the volume size, or select Maxsize. The Maxsize button works differently,
depending on whether a disk is selected.
If you do not have a disk selected when you start the Create Volume wizard, no figure
displays in the volume size box. If you then click on a volume type and also click the
Maxsize button, a size appears in the volume size box that represents the maximum
volume for that layout for all disks in the dynamic group.
If you do have a disk selected when you start the Create Volume wizard, a size is
shown in the volume size box that represents the maximum concatenated (simple or
spanned) volume size on the selected disk. If you then click the Maxsize button, a
new number appears in the volume size box that represents the maximum size for a
spanned volume that spans all the disks in the dynamic group. You can also click
another volume layout and then click the Maxsize button to get the maximum size for
that layout that involves unallocated space on all disks in the dynamic group.